Converting MP4 to MP3 means taking the audio from a video file and producing an MP3 audio file. You can minimize additional quality loss by choosing sensible settings, but ordinary MP3 encoding is lossy, so it cannot guarantee literal 1:1 preservation when the audio has to be re-encoded.
Quick Take
If the audio inside the MP4 is already MP3 and can be copied into an MP3 file without re-encoding, you can preserve the encoded audio unchanged. If the source uses AAC or another codec, creating an MP3 requires a new encoding step, so the goal is to avoid unnecessary quality loss rather than promise lossless conversion.
Can MP4 to MP3 really preserve 1:1 quality?
MP4 is a container, which means one file can hold video, audio, subtitles, metadata, and other streams. The audio inside an MP4 is not automatically MP3. It may be AAC or another codec, and that distinction determines whether the audio must be re-encoded.
MP3 is a lossy format. Its encoder reduces the amount of audio data to make the file smaller, so converting already-compressed audio into MP3 can introduce another lossy generation. Audacity’s MP3 export guidance describes the trade-off between MP3 quality and file size and warns that exporting an imported MP3 as MP3 again causes another quality-loss stage.
There is one important exception. FFmpeg can perform streamcopy, which copies encoded packets without decoding and encoding them again. FFmpeg states that this route introduces no quality loss because no encoding takes place. That is useful when the MP4 already contains a compatible MP3 audio stream.
If the MP4 contains AAC, however, changing it to MP3 is transcoding. A 320 kbps MP3 output does not recover detail that was absent from the source; it only gives the MP3 encoder a higher data rate for the new encode.
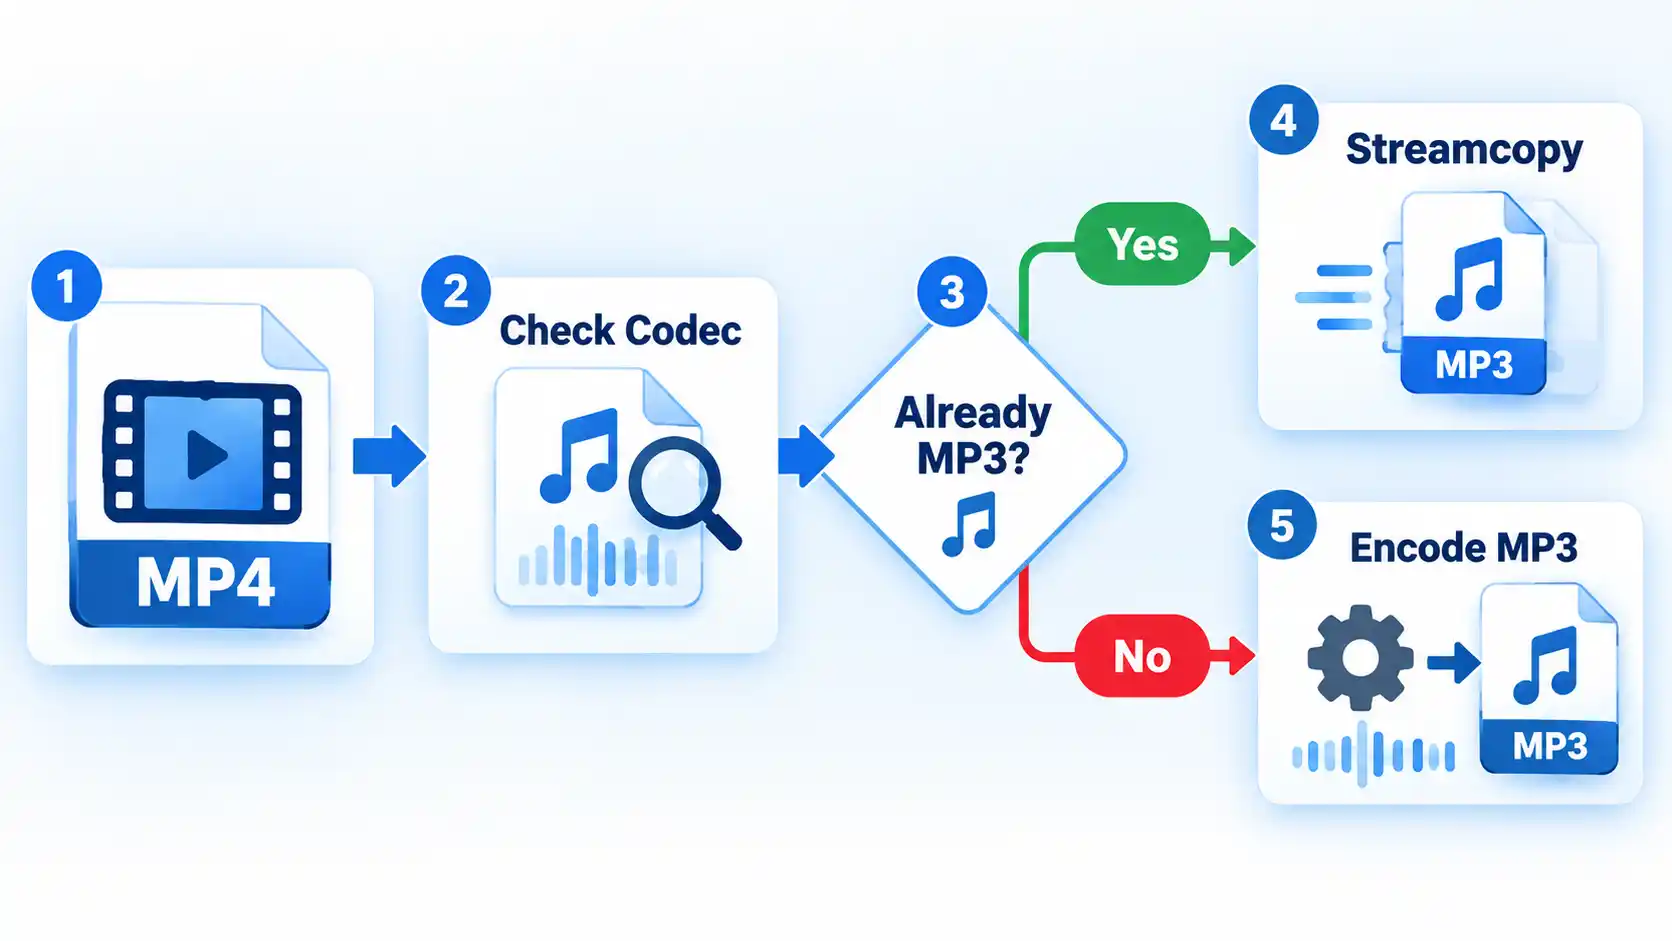
How to convert MP4 to MP3 without unnecessary quality loss
Start with the original MP4 rather than a repeatedly converted copy. First identify the audio stream and codec, then choose either streamcopy for an already-compatible MP3 stream or one MP3 encoding pass for other source codecs.
Prerequisites
- The local MP4 file you own or are authorized to process.
- Enough free storage for the output MP3 while keeping the source MP4 until verification is complete.
- A compatible conversion tool. Audacity is useful when you also need audio editing, while FFmpeg gives you explicit control over codecs and stream selection.
- Identify the source audio. Check which audio stream you want and which codec it uses. Files with multiple languages or commentary tracks need explicit stream selection so that you do not convert the wrong audio.
- Choose streamcopy or MP3 encoding. If the selected stream is already compatible MP3, copy it without re-encoding. If it is AAC or another codec, encode it to MP3 once using settings appropriate for the source and intended use.
- Create a separate MP3 file. Use the graphical, Audacity, or FFmpeg route below. Save the result to a new file instead of overwriting or deleting the MP4.
- Verify the output. Play the MP3, confirm its duration and content, listen for obvious problems, and test it in the device or application where you intend to use it.
Check the audio codec with FFprobe
If FFmpeg is installed, its companion tool FFprobe can show the codec used by the MP4’s audio streams before you decide whether streamcopy is possible:
ffprobe -v error -select_streams a -show_entries stream=index,codec_name,channels,sample_rate,bit_rate -of default=noprint_wrappers=1 input.mp4FFprobe supports selecting streams and limiting output to named stream entries. In the result, look for codec_name. If the intended stream reports mp3, streamcopy may be possible; if it reports aac or another codec, producing MP3 requires encoding.
Graphical desktop route
On Windows, WonderFox HD Video Converter Factory Pro is one graphical desktop route. Its current video-to-audio instructions use a simple local-file workflow: open the Converter module, add the MP4, select an audio output profile, optionally adjust audio parameters, and run the conversion.
- Open Converter and choose Add Files or drag the MP4 into the window.
- Open the output-format selector and choose MP3 under the audio formats.
- If you need to change bitrate, sample rate, or related audio settings, open the program’s parameter settings before conversion.
- Choose the output folder, then select Run to create the MP3.
- Open the finished MP3 and verify it before removing the source MP4.
The same product’s conversion guide also covers how to convert video or audio to MP3. Treat the available bitrate controls as encoding choices, not as a way to restore detail that the source no longer contains.
Convert MP4 to MP3 with Audacity
Audacity can import audio from MP4 files when its optional FFmpeg support is available. Its manual lists MP4 among the additional formats available through the FFmpeg import library.
- Open Audacity and choose File > Import > Audio.
- Select the MP4 file. If Audacity cannot import it, check that Audacity’s optional FFmpeg library is installed and available.
- Play part of the imported track and confirm that it is the audio you intended to extract. If the MP4 contains several audio streams and Audacity imports the wrong one, use explicit stream selection in FFmpeg instead of assuming that Audacity selected the desired track.
- If you need to trim or otherwise edit the audio, make those changes before the final MP3 export.
- Choose File > Export Audio, then select MP3 from the Format menu.
- Choose the channel layout, sample rate, bitrate mode, and quality appropriate for the material, then export to a new MP3 file.
Audacity currently exposes preset, variable, average, and constant bitrate modes as well as channel and sample-rate controls. Its default Standard preset uses variable bitrate rather than the maximum possible MP3 bitrate. Repeated MP3 export adds another lossy encoding stage, so edit from the original or a lossless intermediate when practical.
Convert MP4 to MP3 with FFmpeg
When the selected source audio is not MP3, this command takes the first audio stream from input.mp4, excludes video, encodes the audio with the LAME MP3 encoder, and writes a 192 kbps MP3:
ffmpeg -i input.mp4 -map 0:a:0 -vn -c:a libmp3lame -b:a 192k output.mp3-map 0:a:0 selects the first audio stream from the first input. FFmpeg documents manual stream selection through -map stream specifiers, while -vn excludes video. The libmp3lame wrapper provides MP3 encoding and supports bitrate and variable-quality controls.
If the FFprobe result shows that the selected audio stream is already MP3 and the MP3 output accepts it, use streamcopy instead:
ffmpeg -i input.mp4 -map 0:a:0 -vn -c:a copy output.mp3Do not use the copy command when the selected stream is AAC or another non-MP3 codec. Streamcopy preserves the existing encoded stream; it does not transform one codec into another.
How to choose MP3 bitrate and audio settings
Start with the source and the intended use rather than automatically choosing 320 kbps. MP3 bitrate is the amount of encoded data used per second. Raising it generally gives the encoder more room to preserve detail, but it also increases file size and cannot restore information that was already removed from the source.
Variable bitrate (VBR) changes the data rate according to the complexity of the audio. Constant bitrate (CBR) keeps the selected rate fixed. Audacity’s current guidance says VBR generally provides better quality for a given file size in most circumstances, while CBR gives predictable sizing and is useful where a fixed rate is required.
The table below gives practical starting points rather than claiming that one setting is universally correct.
| Situation | Practical approach | Why | Important limit |
|---|---|---|---|
| Stereo music | Use a good-quality VBR setting or a suitably high bitrate | VBR can allocate more data to complex passages and less to simpler ones | More bitrate does not restore detail absent from the source |
| Speech or voice-only audio | Consider mono when the source does not need stereo separation | Fewer channels can use the available bitrate more efficiently for voice | Do not collapse meaningful stereo material to mono |
| Already heavily compressed audio | Avoid excessive output bitrate and repeated conversions | A much larger MP3 does not undo earlier lossy encoding | Each new lossy encode can introduce further degradation |
| Source audio already MP3 | Use streamcopy when the stream and output are compatible | No re-encoding means the encoded audio packets remain unchanged | Streamcopy cannot convert AAC or another codec into MP3 |
Audacity’s MP3 export controls currently offer sample rates of 32,000 Hz, 44,100 Hz, and 48,000 Hz, along with preset, variable, average, and constant bitrate modes. Its default Standard preset uses roughly 170–210 kbps VBR for stereo music rather than the 320 kbps maximum setting.
Avoid changing sample rate merely to make the number look more familiar. If your source is already 48 kHz, for example, forcing 44.1 kHz adds a resampling step without recovering any audio detail. Change it when compatibility or a specific delivery requirement calls for a different rate.
How to check the MP3 after conversion
A completed progress bar only tells you that the converter finished. It does not prove that you selected the right audio stream, converted the full file, or produced something your target player can use.
Verify the result
- Open the MP3 and confirm that it plays from beginning to end without unexpected silence or obvious corruption.
- Compare its duration with the source MP4 so an incomplete conversion is easier to spot.
- For files with several audio streams, confirm that the MP3 contains the intended language, commentary, or program audio.
- Listen to several parts of the file for clipping, metallic artifacts, unexpected silence, or other audible problems rather than checking only the opening seconds.
- Test the MP3 in the phone, media player, editor, car stereo, or other application where you intend to use it.
- Keep the original MP4 until all checks pass. The MP3 is a derived file and should not become your only remaining source by accident.
MP3 can also introduce a small encoder delay at the beginning of a file. Audacity notes that applications supporting the LAME information tag can compensate for the added silence, while other players may expose it. That matters most when the audio must line up precisely with another track or form a seamless loop.
Common MP4-to-MP3 problems and fixes
The MP3 has no audio
Confirm that the MP4 contains an audio stream and that you selected one that actually carries the program audio. FFprobe can list the audio streams before conversion, while an explicit FFmpeg mapping such as -map 0:a:0 selects the first audio stream. If the file contains no audio stream, there is nothing to convert to MP3.
The wrong language or commentary track was converted
The MP4 probably contains more than one audio stream. Use FFprobe to identify the available stream indexes, then map the required stream explicitly in FFmpeg. For example, if the desired audio is the second audio stream, change -map 0:a:0 to -map 0:a:1, then verify the finished MP3 before deleting the source.
The MP3 sounds worse than the source
Check whether the source was already compressed and whether the output bitrate was set unnecessarily low. Re-encoding to MP3 is lossy, so another encode can add audible artifacts. Return to the original MP4 and encode once with a more suitable quality setting rather than repeatedly converting an MP3.
The MP3 is much larger than expected
Check the bitrate mode and selected bitrate. A very high constant bitrate can create a substantially larger file without recovering lost source detail. For ordinary music, a suitable VBR setting may provide a better size-to-quality balance.
Audacity will not import the MP4
Audacity relies on its optional FFmpeg library to import MP4 and several other formats. Install or repair the supported FFmpeg library, restart Audacity if required, and try File > Import > Audio again.
FFmpeg reports that libmp3lame is unavailable
Your FFmpeg build may not include that encoder. FFmpeg’s codec documentation states that the libmp3lame wrapper requires the LAME library to be present when FFmpeg is configured. Use a build that includes the encoder rather than substituting an unverified codec or command.
The main quality rule is to work from the best source you have and avoid unnecessary lossy generations. When an MP3 stream can be copied without re-encoding, streamcopy preserves the encoded audio; when transcoding is required, sensible settings can reduce additional loss but cannot make MP3 compression lossless.

💬 Comments