To monitor a hidden or security camera from your phone, first identify the exact camera model and the app or viewing system it supports. Pair it locally, confirm the live feed, then test again over mobile data so you know remote viewing works outside your home network.
The important part is compatibility. There is no universal “spy camera app” that works with every camera, and setup steps differ between dedicated Wi-Fi cameras, recorder-based closed-circuit television (CCTV) systems, cameras that create their own hotspot, and apps that turn a spare phone into the camera.
First, Identify How Your Camera Connects
Before installing apps or changing router settings, find the camera’s manufacturer, model number, manual, quick response (QR) code label, or existing recorder connection. Those details tell you which mobile app and pairing method the hardware actually expects.
A purpose-built Wi-Fi camera normally uses its manufacturer’s mobile app or an app specified in its documentation. Some cameras instead connect through a Network Video Recorder, or NVR, which receives and stores video from network cameras and may provide the phone-facing remote-viewing service.
Other systems are local-only. A camera might create a temporary Wi-Fi hotspot for setup or direct viewing but still lack internet-based remote access. This is why a camera that works while your phone is on the same local area network (LAN) can stop working as soon as you leave home.
If you need to understand why one system works from another network while another stays local, the distinction comes down to how security camera remote access works across cloud services, peer-to-peer connections, recorders and local-network paths.
Some purpose-built products are disguised as everyday objects, including hidden charger cameras. With these devices, use only the pairing method specified for the exact model, and use concealed cameras only where you are authorized to install and operate them.
The same principle applies to indoor security cameras: Wi-Fi support, mobile-app compatibility, local storage and remote viewing vary by model rather than by appearance.
How to Connect a Camera to Your Phone
Use the camera maker’s documented setup flow rather than copying button sequences from an unrelated model. QR pairing, Bluetooth discovery, a temporary camera hotspot, local-network discovery and recorder-based enrollment are all possible.
Prerequisites
- The camera manufacturer and exact model number, or access to the recorder it belongs to.
- The official or manufacturer-specified mobile app from a trusted app store.
- Physical access to the camera for initial pairing when the manufacturer requires it.
- Your authorized camera, recorder or cloud-account credentials.
- Access to the Wi-Fi or other network the camera is supposed to use.
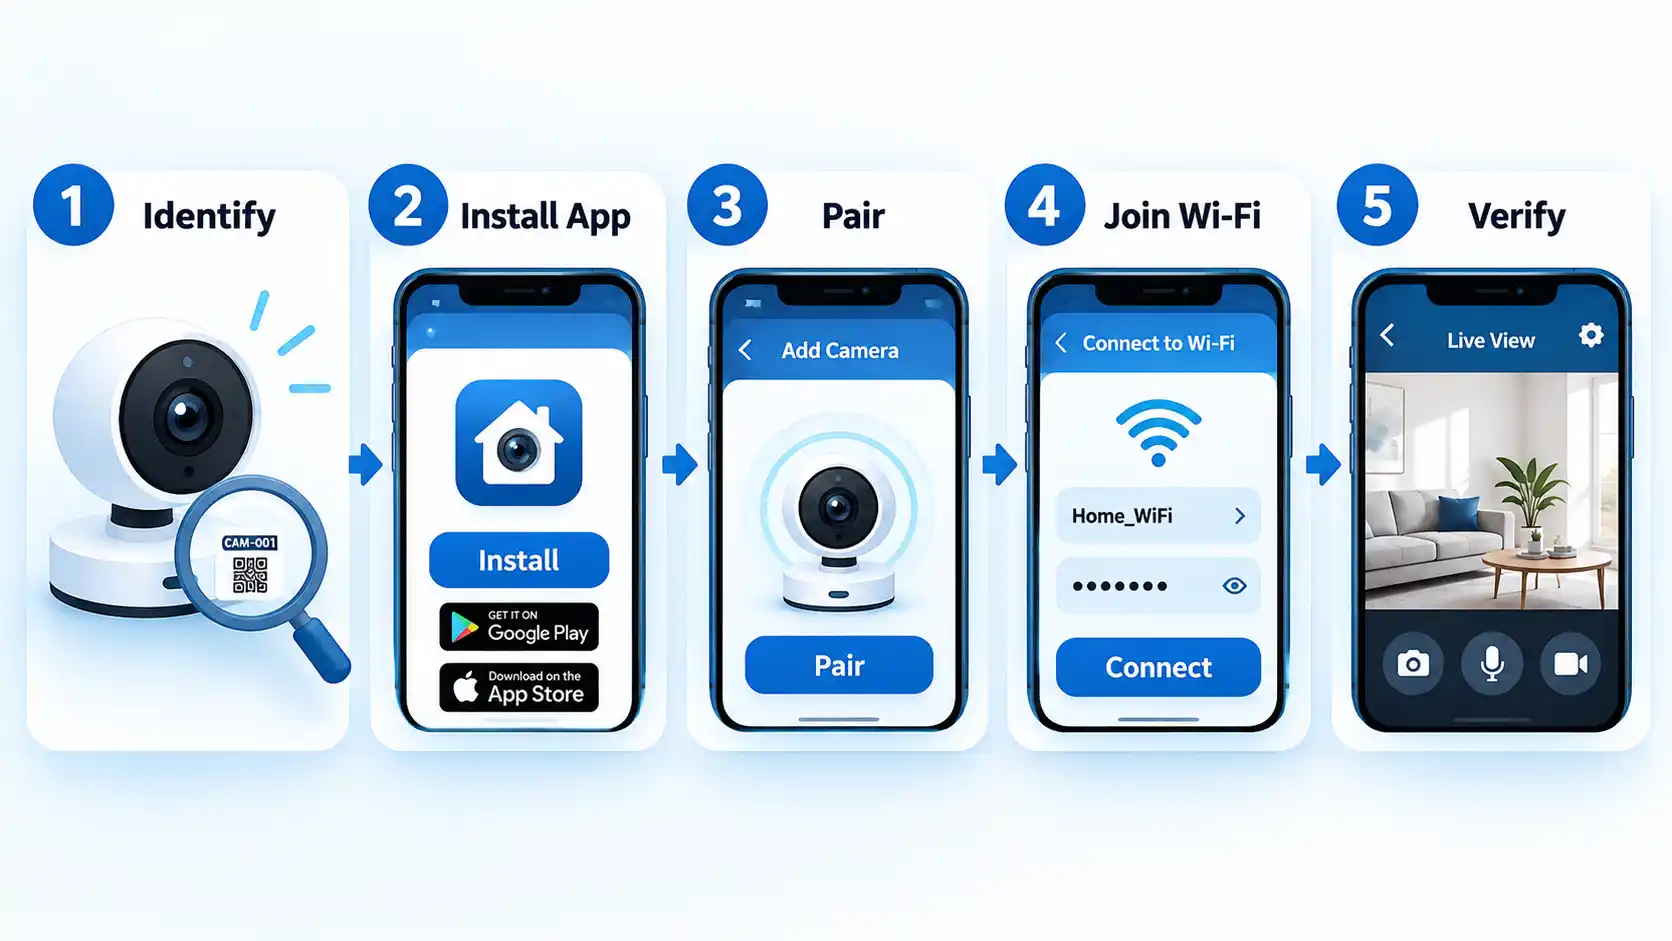
- Identify the camera and its supported viewing method. Check the model label, manual, recorder interface or manufacturer support page. Do not assume that two Wi-Fi cameras use the same app.
- Install the correct mobile app. Use the app named by the manufacturer or recorder vendor. Avoid installing a similarly named third-party app merely because it appears in a search result.
- Put the camera into its documented pairing state. Some devices are ready for setup when first powered on, while others require a reset or setup button. Follow the instructions for the exact model rather than using a universal reset duration.
- Add the camera in the app. The app may ask you to scan a device QR code, show a QR code to the camera, connect briefly to the camera’s Wi-Fi hotspot, discover it on the local network, or add it through an NVR or base station. AlfredCamera, for example, documents same-account and QR-code methods for connecting one mobile device acting as the camera to another acting as the viewer in its current setup instructions.
- Connect it to the supported network. Enter the Wi-Fi credentials or complete the recorder or base-station setup requested by the app. Use the Wi-Fi band and security mode supported by the exact camera model rather than assuming that every camera requires the same network configuration.
- Secure the account during setup. Use a unique password and enable multi-factor authentication when the service supports it. If the device was previously owned or configured, make sure it is legitimately removed from the former account before attempting to bind it to yours.
- Open Live View while you are still on the local network. Confirm that the image is current rather than a cached thumbnail. If the camera exposes audio, two-way talk, pan-and-tilt controls or playback, test only the functions you actually intend to use.
- Test genuine remote viewing. Turn Wi-Fi off on your phone, use mobile data, reopen the app and load the camera again. A feed that works only while both devices are on the same LAN is not yet a working internet remote-view setup.
- Configure alerts and recording separately. Live viewing, motion notifications and stored video are different functions. Google, for example, distinguishes live streaming from event video history and eligible 24/7 video history in its current Nest camera documentation.
11 Current Phone-Monitoring Options and App Ecosystems
The app you should use is determined mainly by the hardware you already have. The following are informational compatibility examples, not ranked recommendations. Features, subscriptions and supported models can change, so check the exact device documentation before buying hardware or relying on a particular recording feature.
| Option | Works with | Typical phone-monitoring path | Important limitation |
|---|---|---|---|
| AlfredCamera | Spare Android or iOS phones and supported Alfred hardware | One phone can act as the camera while another acts as the viewer. Alfred documents linking the devices with the same account or by QR code in its setup guide. | It is primarily its own phone-camera ecosystem; it is not a universal viewer for unrelated Wi-Fi cameras. |
| Google Home / Nest | Compatible Nest cameras and doorbells | The Google Home ecosystem supports live camera viewing and, depending on the device and service, event or continuous video history. Google explains the distinction in its video-history guidance. | Available history and continuous recording depend on camera model, power configuration and service eligibility. |
| Reolink | Reolink cameras and NVRs | The Reolink App supports remote multi-screen live streaming, video playback and notifications across supported Reolink cameras and recorders according to its current app guide. | Capabilities vary by camera type, recorder configuration and network path. |
| Wyze | Wyze cameras | The Wyze app provides camera live streams and related controls. Wyze’s livestream documentation describes current viewing controls and model-specific functions. | Recording, event and control features vary by camera model and storage configuration. |
| Blink | Blink cameras and doorbells | Blink provides real-time video and audio through Live View in the Blink app, as documented in its current feature documentation. | Saving motion clips or Live View recordings depends on the supported subscription or local-storage configuration. |
| Arlo | Arlo cameras and supported base-station configurations | The Arlo Secure App Devices tab provides access to cameras and a play control for live streaming, as documented in Arlo’s current app guidance. | Available controls and streaming behavior depend on the camera and system configuration. |
| eufy Security | Supported eufy security cameras and doorbells | eufy documents using the eufy Security app to connect supported cameras and view their feeds remotely in its remote-viewing guidance. | Browser access, remote viewing and storage options vary by device and configuration. |
| Ring | Ring cameras and video doorbells | The Ring app provides Live View for supported cameras and doorbells. Ring’s Live View documentation distinguishes basic live access from subscription-dependent recording and extended viewing features. | Recorded-video access and some extended Live View functions require a compatible subscription. |
| TP-Link Tapo | Tapo cameras and doorbells | The Tapo app provides Live View and access to supported recordings. TP-Link’s recording guidance explains how continuous local recordings are accessed through the app when the device and storage configuration support them. | Remote-stream duration, recording support and storage options vary by model and configuration. |
| EZVIZ | EZVIZ cameras, doorbells and supported recorder systems | The EZVIZ app currently lists Live View, multi-view, video playback, instant notifications and remote controls among its app functions. | Available functions depend on the device and storage configuration. |
| Manufacturer-specific companion app | White-label or specialist cameras that specify their own mobile app | Use the app named in the exact camera manual, QR label or manufacturer’s support documentation. The onboarding method may involve a QR code, temporary camera hotspot or local discovery. | Do not assume that an unrelated generic camera app will recognize or safely manage the hardware. |
The table also shows why live viewing and stored footage should not be treated as the same feature. Whether you can replay an event later depends partly on cloud vs local security camera storage, the camera’s recording configuration and any applicable service plan.
How to Tell Whether Remote Viewing Really Works
A successful setup is more than seeing the camera while standing beside the router. The most useful check is to deliberately move the phone onto a different network and confirm that the intended remote path still works.
Verify the result
- Live View loads while the phone is connected to the same local network as the camera.
- After Wi-Fi is disabled on the phone, the camera still loads over mobile data if internet remote viewing is intended.
- The displayed feed is current and responds to an observable change in the camera’s authorized field of view.
- Motion or event notifications arrive only if you intentionally enabled them.
- Recorded playback works from the expected microSD card, recorder or cloud destination if recording is part of the setup.
- Other users can access only the cameras and functions you intentionally shared with them.
This test can reveal a common false positive: local viewing works, so the setup appears complete, but the remote service or account path was never successfully configured.
Secure the Camera Before Leaving Remote Access Enabled
The camera account and network path become part of the security boundary when remote access is enabled. In its Ring enforcement case, the Federal Trade Commission charged the company with privacy and security failures that allowed overly broad employee or contractor access and contributed to attackers taking control of customer accounts, cameras and videos. The FTC case record describes the allegations and resulting settlement.
At minimum, replace default or reused credentials, keep supported camera and app software current, enable multi-factor authentication where available, review shared users, and avoid exposing camera services directly to the internet when the manufacturer’s supported remote method does not require it. The National Institute of Standards and Technology (NIST) also addresses reducing unnecessary network exposure in its guidance on securing small-business and home Internet of Things (IoT) devices.
For an existing CCTV or IP-camera installation, the practical hardening steps are covered in more depth in how to secure IP cameras and CCTV recorders from remote-access risks, including credentials, updates, router exposure, multi-factor authentication and network isolation.
Use remote monitoring only for cameras and spaces you are authorized to monitor. A microphone can also capture nearby conversations, so treat audio recording as a separate privacy decision rather than assuming that permission to install a camera automatically covers audio.
Google’s current Nest documentation illustrates that separation directly: when the camera microphone is turned off, the camera does not stream or record audio. Google documents the control in its camera audio settings guidance.
What About Turning an Old Phone Into the Camera?
A dedicated security camera is not required if your goal is to reuse hardware you already own. Apps such as AlfredCamera use a two-device model: one phone remains in place as the camera and another acts as the viewer. Alfred currently documents both signing into the same account on the two devices and QR-code linking.
This approach changes the hardware, but the same operational issues still matter: stable power, a reliable network connection, an appropriate field of view, account security and a way to confirm the camera has not gone offline.
If that is the setup you want, the complete process for turning an old phone into a home security camera covers the dedicated spare-phone workflow separately rather than duplicating it here.
Common Problems When the Camera Will Not Connect
Start with the symptom rather than resetting everything at once. If the feed recently stopped working, why a security camera is offline on your phone usually becomes clearer when you separate pairing, local-network, account and remote-access failures.
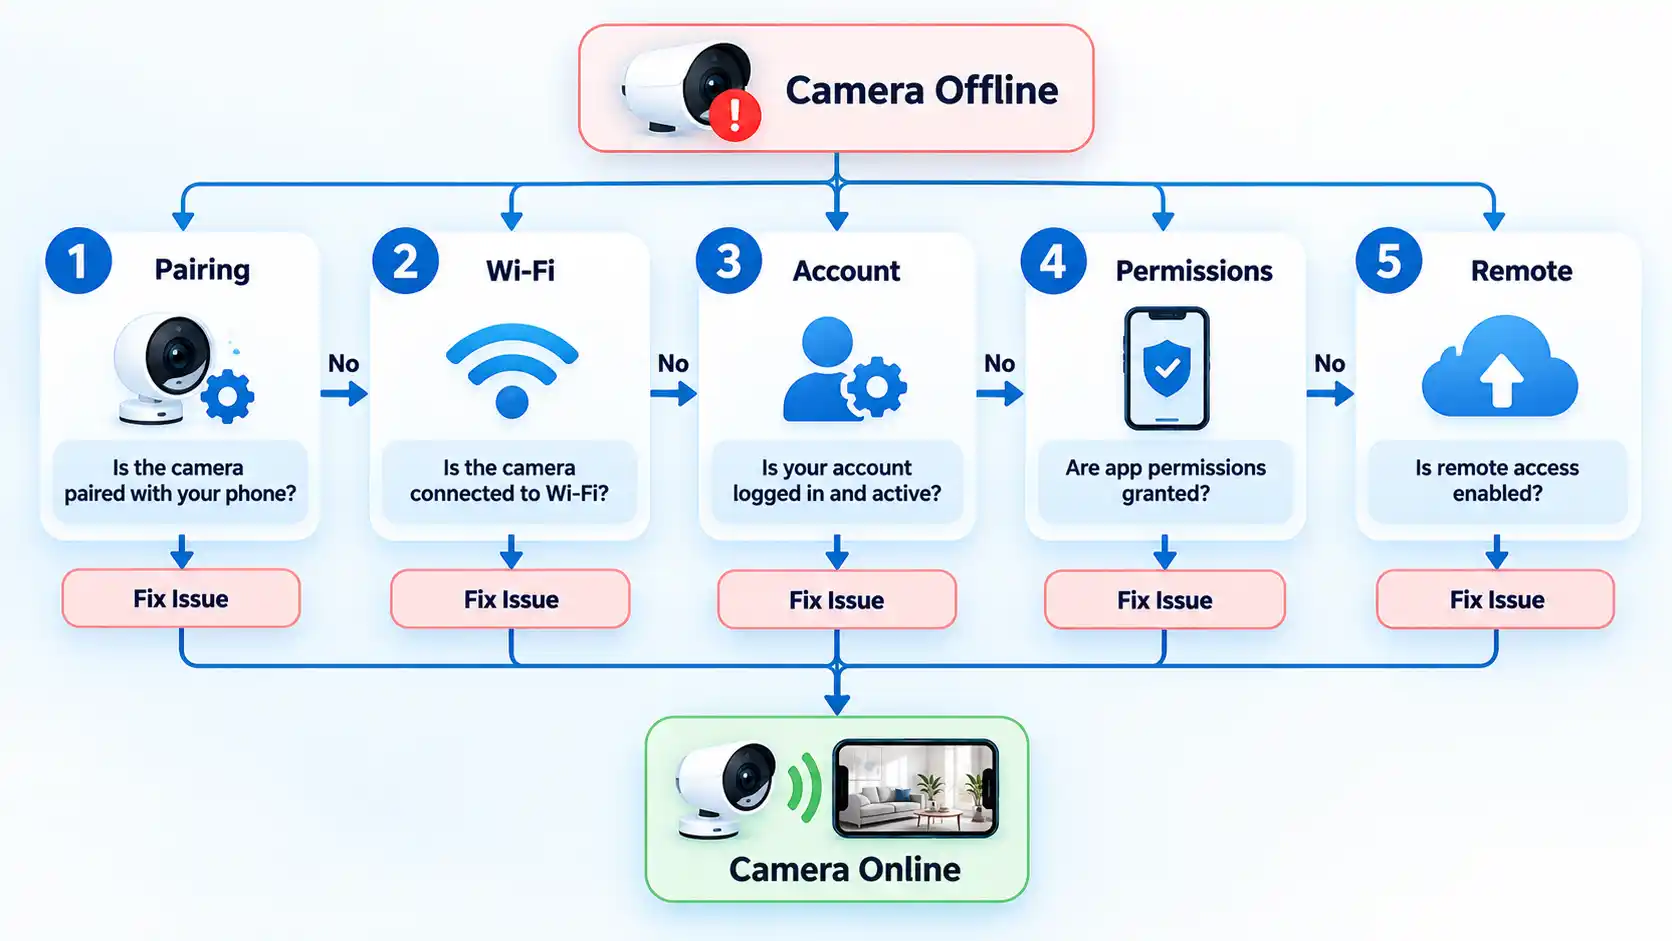
The app cannot find the camera during setup
Confirm that you installed the app specified for the exact camera and that the device is genuinely in its documented setup state. Keep the phone near the camera during initial pairing and temporarily grant any local-network, Bluetooth or nearby-device permission that the manufacturer’s setup flow specifically requires. If the camera was previously attached to another account, check the manufacturer’s ownership-transfer process rather than repeatedly resetting it.
The camera joins Wi-Fi but immediately goes offline
Check signal quality at the camera’s actual installation point and verify that the exact model supports the Wi-Fi band and security mode used by the router. Do not assume every camera requires 2.4 GHz or supports 5 GHz. Also check whether a guest network or access point (AP) isolation setting prevents the phone, recorder or another required local device from communicating with the camera.
Live View works on home Wi-Fi but not on mobile data
The local camera path is working, but the intended remote path is not. Confirm that remote access is supported and enabled for the model, that the camera or recorder reports itself online, and that the account is signed in correctly. Avoid creating new port-forwarding rules as a first response. If you recently hardened the network, review the specific change that affected remote access rather than restoring every old exposure.
The camera is online but Live View keeps timing out
Test another network, reduce stream quality if the app provides that control, and check upstream bandwidth at the camera location. Local and remote streaming can also behave differently. TP-Link, for example, states in its current Tapo Live View guidance that remote viewing is subject to a continuation prompt after a period, while local viewing on the same network can remain continuous when the connection is stable.
Notifications work but no recorded clip is available
Check recording separately from detection. A camera may detect an event and send a notification without storing footage unless cloud recording, microSD recording, NVR recording or another supported storage method is enabled. Verify the storage destination and its status instead of assuming an alert proves that a clip was saved.
Playback works, but the live feed does not
Stored video and live streaming are separate functions. Confirm the camera itself is currently online, then restart only the affected app or camera according to the manufacturer’s guidance. A previously stored event may remain available even when the camera no longer has a current network connection.
The camera stopped connecting after a virtual private network (VPN) or router change
For initial pairing, temporarily test without the phone’s VPN if the manufacturer requires local-network discovery. If the router configuration changed, check Wi-Fi credentials, network isolation, firewall rules and Domain Name System (DNS) connectivity before factory-resetting the camera. Restore only the specific communication path the documented setup requires.
Privacy and Recording Boundaries
A camera you own can still capture people, conversations or spaces where additional privacy rules, workplace policies, rental conditions or consent requirements apply. The applicable requirements depend on the jurisdiction, the location of the camera, whether audio is captured, who is being monitored and the circumstances of the recording.
For that reason, treat authorization as part of setup. Avoid monitoring spaces such as bathrooms, changing areas or other locations where people reasonably expect a high degree of privacy, and check the laws and policies that apply to your location before recording other people. This article explains the technical setup and does not substitute for jurisdiction-specific legal advice.
If audio is not necessary, disabling it can reduce the amount of sensitive information the system collects. Also review shared-user permissions periodically instead of leaving old household, contractor or staff access active indefinitely.
Bottom Line
Monitoring a hidden or security camera from your phone starts with identifying the hardware and using the viewing method it actually supports. Pair the camera locally, verify live video, test again over mobile data, then configure recording, alerts and sharing as separate functions.
Do not rely on generic pairing instructions or assume every camera uses the same Wi-Fi band, cloud service or app. Once remote viewing works, secure the account and network path and keep the camera limited to authorized monitoring.

💬 Comments