If your eSIM is not working on iPhone, first identify what has actually failed: the eSIM may be missing or unable to activate, installed but disconnected from the carrier, connected to the carrier but unable to use mobile data, or affected by a Dual SIM configuration problem. The correct fix depends on which of those states you can see.
Do not start by deleting the eSIM or changing network settings at random. An installed eSIM profile, successful carrier connection, and working mobile data are separate states, so troubleshooting the wrong layer can create another problem without fixing the original one.
This guide uses Cellular for the mobile-network menu. Depending on your iPhone’s language and region, it may appear as Mobile Service, Mobile, or Mobile Data. Likewise, Cellular Data may be labelled Mobile Data, and Carrier Lock may appear as Network Provider Lock.
Start With What Your iPhone Is Showing
Open Settings > Cellular to check whether the expected line is listed. Then inspect its carrier status in Control Centre: swipe down from the top-right corner on an iPhone with Face ID, or swipe up from the bottom on an iPhone with a Home button. Match the result to the branch below.
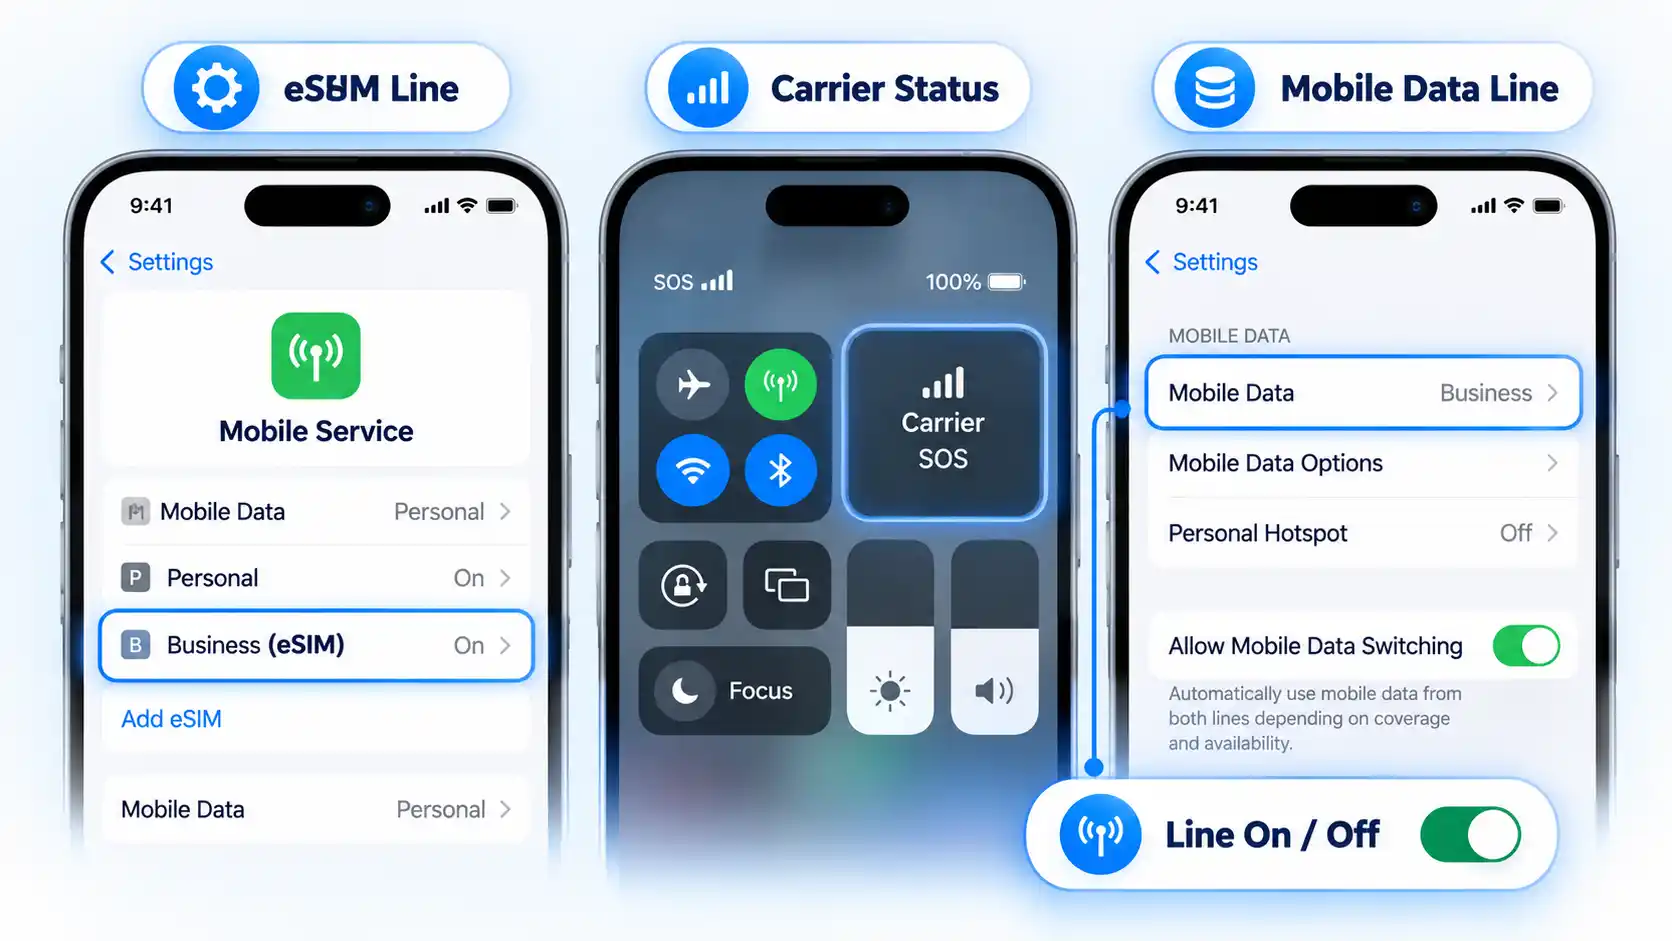
- The eSIM is missing: the expected mobile plan does not appear in Settings. Start with the activation section.
- The eSIM appears, but you see SOS, No Service, or Searching: the profile exists, but the iPhone is not currently connected to the mobile network. Use the network-registration section.
- The carrier appears, but mobile data fails: the phone has progressed further than a complete No Service failure. Isolate the selected data line, roaming requirements, and Access Point Name (APN) configuration.
- One line works but another does not: treat it as a Dual SIM problem rather than assuming the whole cellular system has failed.
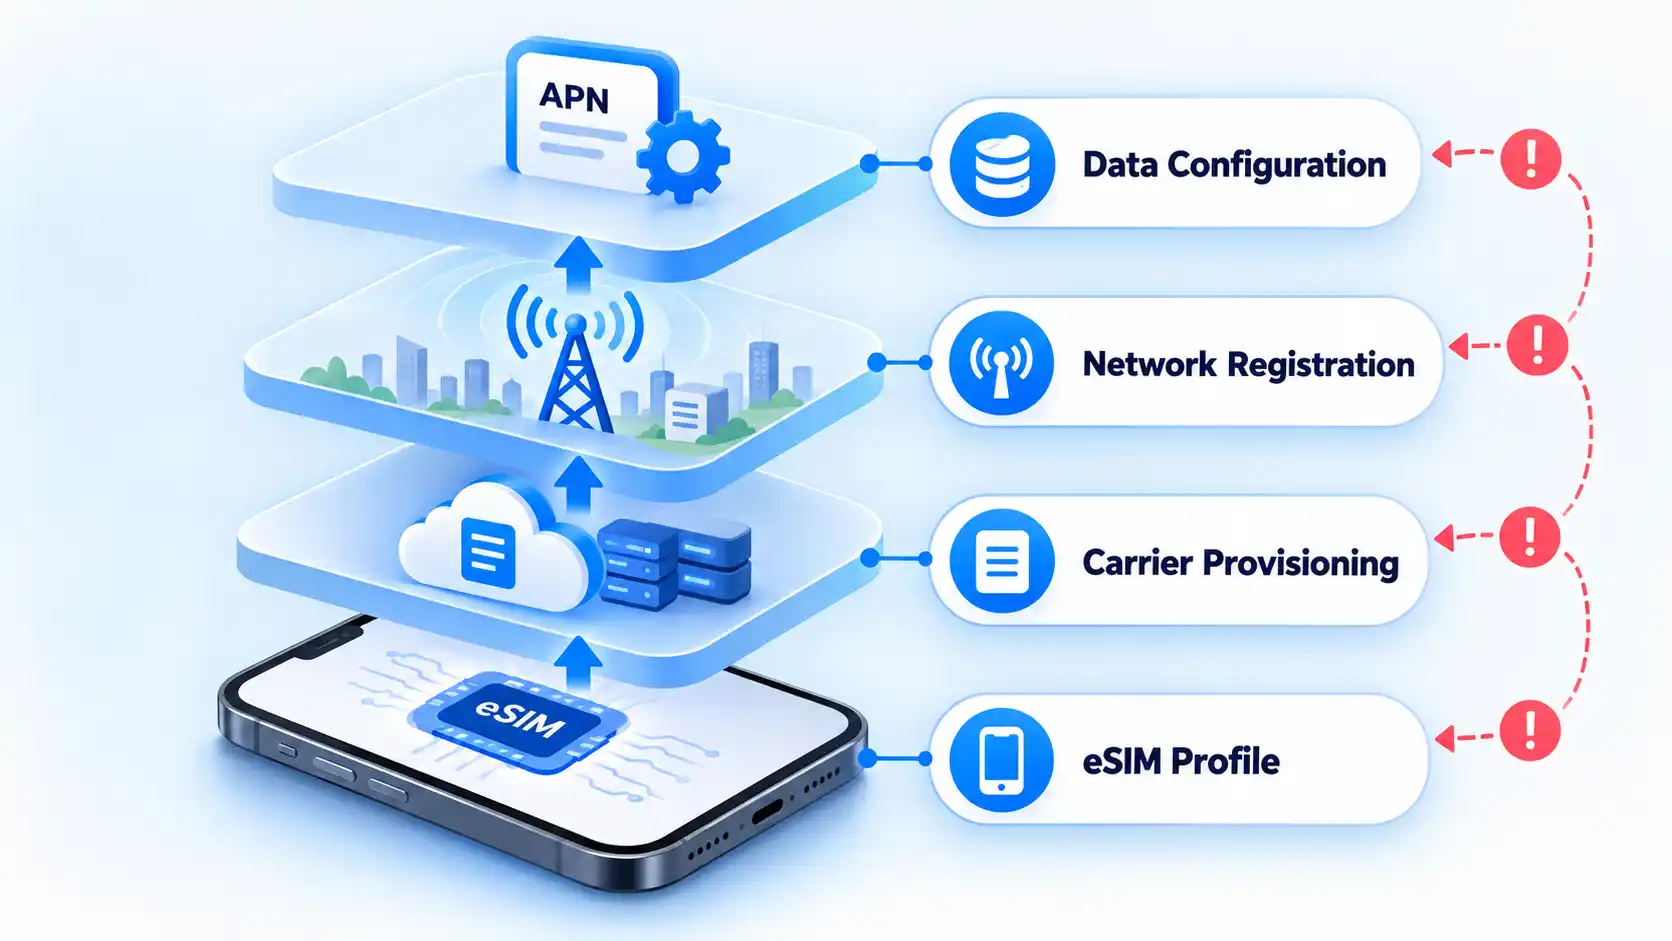
This distinction matters because eSIM activation involves more than storing a digital SIM profile on the phone. The carrier still has to provision the plan and the iPhone has to register successfully for service.
If you are troubleshooting a phone that previously used a physical SIM, the basic network role has not changed: an eSIM and a physical SIM both connect the phone to a carrier network. What changes is how the carrier profile is installed and transferred.
If the eSIM Is Missing or Won’t Activate
Use this procedure if the eSIM never appears as an available line, setup produces an activation error, or activation starts but does not complete. At this stage, concentrate on getting the plan installed and recognized before troubleshooting mobile data.
- Confirm that the plan can be activated. Make sure you have an active mobile plan from a carrier that supports eSIM and that the iPhone is connected to Wi-Fi or a hotspot. An internet connection is the normal setup requirement, although some eSIM-only iPhone models can activate without Wi-Fi in certain countries and regions. Also check Settings > General > Software Update and install the latest iOS version the iPhone supports.
- Check for a carrier lock if you are changing carriers. Open Settings > General > About and find Network Provider Lock. If it says No SIM restrictions, the iPhone is unlocked. Only the current carrier can remove a carrier lock, so contact it if the new eSIM belongs to a different carrier and the phone is still restricted. The same lock check is useful when confirming that an unlocked phone can accept service from another compatible network.
- Refresh the cellular connection. Open Settings, turn Airplane Mode on and then off, and open Control Centre afterward and check whether the carrier now appears.
- Check whether the line exists but is disabled. Open Settings > Cellular and tap the affected line. If Turn On This Line is disabled, enable it. If it is already enabled, turn it off and then back on. Check Control Centre again before continuing.
- Restart the iPhone. After it restarts, check whether the line appears and whether the carrier is visible in Control Centre. On iOS 18 or later, the current Apple Support app can also run additional diagnostics when the cause remains unclear.
- Check the carrier-settings version. Go to Settings > General > About, scroll to the eSIM section, and find the version beside Network Provider. Tap the version number. If an update is available, choose OK or Update.
- Stop if the eSIM still cannot be set up. If the line is still absent or activation still fails after these checks, contact the carrier that issued the eSIM. At this point, the carrier may need to check plan provisioning or account information that the iPhone cannot repair locally.
Do not delete an installed eSIM merely to repeat these steps. Reinstallation and activation-code rules can vary by provider, so remove the profile only when the carrier or eSIM provider specifically instructs you to do so.
If the eSIM Is Installed but Shows SOS or No Service
If the eSIM appears in Settings but the iPhone shows SOS, No Service, or Searching, installation is no longer the main problem. No Service or Searching means the device is not connected to a mobile network, so the next job is to restore or diagnose that network connection.
- Force a fresh network connection. Open Settings, turn Airplane Mode on for at least 15 seconds, and then turn it off. Give the iPhone a moment to search for the carrier again.
- Restart the iPhone. After the restart, check the status area again. If the carrier returns, test only the service included with the plan before making further changes.
- Make sure the eSIM line is enabled. Open Settings > Cellular, tap the affected line, and check whether it is on. If it is off, tap Turn On This Line, then check for service again.
- Rule out a carrier, account, or coverage problem. If the iPhone still cannot register, check with the carrier that the account is active and in good standing, the device is not blocked from mobile service, the correct plan is attached, and there is coverage with no local outage. These conditions are carrier-side checks rather than settings the iPhone can verify by itself.
- Update iOS and carrier settings. Check Settings > General > Software Update and install the latest iOS version the iPhone supports. Then connect to Wi-Fi and open Settings > General > About. If a carrier-settings update is available, install it.
- Escalate persistent No Service. If the carrier confirms that the account, plan, coverage, and network are normal but the iPhone still cannot connect, carrier support or Apple service may be needed to distinguish provisioning from a device problem.
If the Carrier Appears but Mobile Data Does Not Work
If the carrier appears and the line is enabled but websites or apps cannot use cellular data, isolate the data connection instead of repeating activation steps. Start by making sure Wi-Fi or another cellular line is not hiding which connection the iPhone is actually using.
- Turn off Wi-Fi for the test. Go to Settings > Wi-Fi and switch Wi-Fi off. A working Wi-Fi connection can otherwise hide a failed eSIM data connection.
- Select and isolate the intended data line. Go to Settings > Cellular > Cellular Data and select the eSIM you want to test. If available, temporarily switch off Allow Cellular Data Switching (or Allow Mobile Data Switching) on that screen. End any active voice call before testing. Turning switching off can interrupt mobile data during calls on the other line; use it here to isolate the test, then restore your preferred setting afterward.
- Apply roaming only when the plan requires it. If your carrier or eSIM provider says this plan requires roaming, go to Settings > Cellular, select the affected line, and enable Data Roaming, opening Cellular Data Options or Mobile Data Options first if shown. Check the plan’s roaming terms before enabling it; using a plan abroad does not automatically mean roaming is included without extra charges. Do not treat this as a universal fix for every eSIM.
- Check the APN only if your carrier requires it. APN stands for Access Point Name, the network path the iPhone uses for mobile data. Depending on the carrier, the setting can appear under Settings > Mobile > Mobile Data Network or Settings > Mobile Data > Mobile Data Options > Mobile Data Network. If neither option exists, contact the carrier rather than trying to expose or override it.
- Use only carrier-supplied APN values. Incorrect APN settings can disable mobile data and may cause additional charges. Do not copy an APN from an unrelated carrier or a generic troubleshooting page. If your carrier permits APN editing, enter only the values it supplies.
- Test cellular data again. Keep Wi-Fi and data switching off, confirm the intended eSIM remains selected for data, and test with no voice call in progress. Open a new webpage or another service that requires a live data connection. If data still fails while the carrier remains visible, contact the carrier to verify the plan’s data provisioning and APN requirements.
After testing, turn Wi-Fi back on and restore your preferred data line and switching setting. The data-line selection and call-related switching controls determine which plan supplies the connection.
Successful voice service does not prove that cellular data is configured correctly, and the reverse can also be true for a data-only eSIM. Judge the result against the services included with your actual plan.
If One Line Works but the Other Does Not
When an iPhone has two active plans and only one is failing, troubleshoot the affected line rather than treating the phone as completely offline. Dual SIM adds another variable because the two plans can have different carriers, account states, coverage, and data roles.
- Confirm that both plans are valid for Dual SIM. Both plans must be set up and ready to use, and the carriers involved must support Dual SIM with eSIM. If the plans come from different carriers, the iPhone must be unlocked.
- Check that the affected line is present and enabled. Open Settings > Cellular and confirm that both expected plans are listed. Tap the failing line and enable Turn On This Line if it is off. With no voice call in progress, check its carrier status in Control Centre. If the plan is missing, use the activation branch above; if it remains enabled but shows SOS or No Service, use the network-service branch.
- Check the affected line’s account and network state. If the plan exists but will not work, confirm with its carrier that the plan is eligible for Dual SIM, coverage is available, there is no outage, and billing has not blocked service. Corporate plans may also require confirmation from the company or carrier that Dual SIM is supported.
- Check which line is handling mobile data. An iPhone uses one mobile-data network at a time. Go to Settings > Cellular > Cellular Data and select the intended line. If you are testing a data failure, use the isolated data test above, including its temporary switching setting and no-call condition.
- Account for call-related Dual SIM behavior. Seeing No Service on the other line during a call does not always mean that eSIM has failed. The other line can show No Service while one line is being used for a call; available behavior depends on features such as Wi-Fi Calling and Allow Mobile Data Switching.
- Escalate only the failing line. If one plan works normally and the other remains unavailable after these checks, contact the carrier responsible for the failing plan. That isolates the support request from the line that is already known to work.
If you regularly choose between two active plans, the difference between using an eSIM and configuring Dual SIM matters because eSIM describes the SIM technology, while Dual SIM describes using two mobile plans on the iPhone.
When to Stop Troubleshooting and Contact Your Carrier
Stop changing iPhone settings when the correct line is present and enabled but activation or network service still fails after the relevant sequence above. At that point, the carrier may need to inspect provisioning, billing, account eligibility, a device block, an outage, or another network-side condition that is not visible from the iPhone.
The eSIM still will not activate
Contact the carrier that issued the eSIM after you have confirmed internet access, current iOS, Airplane Mode, line visibility, a restart, and carrier settings. Keep the exact activation error visible or write it down before contacting support.
The eSIM is installed but the iPhone still has no carrier service
Ask the carrier to verify that the account is active, the correct plan is provisioned, the device is not blocked or barred, coverage is available, and there is no relevant outage. If the carrier confirms that its account and network are normal and a hardware problem is suspected, Apple service may be the next step.
The carrier appears but cellular data still fails
Tell the carrier that network registration succeeds but data does not. Ask it to verify the plan’s data provisioning and, when applicable, the correct APN. Do not substitute APN values from another carrier.
Only one of two mobile plans is failing
Contact the carrier responsible for the failing line and identify it clearly. Ask it to verify Dual SIM eligibility, account status, coverage, outages, and billing. A working second line is useful evidence because it shows that the iPhone is not completely disconnected from cellular service.
What information should I have ready for carrier support?
Record the exact error message and have your phone number plus the carrier account password or personal identification number (PIN) available. Also collect the iPhone’s IMEI, which identifies the phone on mobile networks, and its EID, the identifier associated with the embedded SIM. Both are available under Settings > General > About. Have those identifiers ready when contacting the carrier about an eSIM setup failure.
The useful stopping point is observable: either the intended line reconnects and the service included with your plan works, or you have narrowed the failure far enough that the carrier or Apple can investigate the remaining account, network, provisioning, or hardware layer.

💬 Comments