To install an eSIM on an iPhone, first identify how your carrier or eSIM provider supplied the plan, then use the matching setup method. Depending on the carrier, that may be a QR code, a transfer from another iPhone, automatic Carrier Activation, an activation link or app, or manual eSIM details.
You do not need to try those methods in order. They are alternative ways to install the same type of digital carrier profile, and the correct route depends on what your carrier supports.
Menu names vary by language and region. This guide uses Cellular; your iPhone may display Mobile Service or Mobile Data instead. Likewise, Add Cellular Plan may appear as Add Mobile Plan.
Before You Install an eSIM
An eSIM is a digital SIM built into the iPhone rather than a removable card. If you are deciding between SIM formats rather than trying to install one, eSIM and physical SIM differ most noticeably when you switch phones or carriers. For installation, the more important question is whether your iPhone and carrier support the eSIM you want to activate.
Prerequisites
- Use an eSIM-compatible iPhone. Apple currently lists iPhone XS, iPhone XS Max, iPhone XR, and later as supporting eSIM, with regional exceptions for some models.
- Have an active plan from a carrier or worldwide service provider that supports eSIM.
- Connect the new iPhone to Wi-Fi or a hotspot. Apple notes that some eSIM-only iPhone models can activate without Wi-Fi in certain countries and regions.
- Update to the latest iOS version your iPhone supports under Settings > General > Software Update. Quick Transfer has additional software requirements, listed below.
- Keep the activation material your carrier supplied, such as a QR code, activation link, carrier app instructions, or manual eSIM information.
These requirements are covered in Apple’s current eSIM setup requirements. Regional hardware matters: Apple documents different eSIM availability for some iPhone models sold in China mainland, Hong Kong, and Macao, so check your exact model and region rather than relying only on the iPhone family name.
If the eSIM comes from a different carrier than the one your iPhone is locked to, check the lock before installation. Go to Settings > General > About and look for Network Provider Lock or Carrier Lock; an unlocked iPhone shows “No SIM restrictions”. The broader checks involved in using an unlocked phone on another compatible network also include the exact model and network support.
Choose Your eSIM Installation Method
Match the activation material or existing line to one route below. You only need to use the method supported by your carrier.
| What you have | Method to use | Check before starting |
|---|---|---|
| A carrier-issued QR code | QR code installation | Use the code issued for your plan. |
| An active number on your previous iPhone | Quick Transfer | Your carrier must support it, and both phones must meet the requirements below. |
| A notification that a carrier plan is ready | Carrier Activation | The carrier must have assigned the plan to this iPhone. |
| An activation link | Carrier link | Use iOS 17.4 or later. |
| Instructions to activate through an app | Carrier app | Use your carrier’s official app and instructions. |
| Manual activation information | Manual entry | Use only the exact values supplied by the provider. |
Install an eSIM With a QR Code
Use this method when your carrier or eSIM provider gives you a QR code. The code contains the information needed to retrieve or configure that plan, so use the code supplied for your specific eSIM.
QR code on another screen or on paper
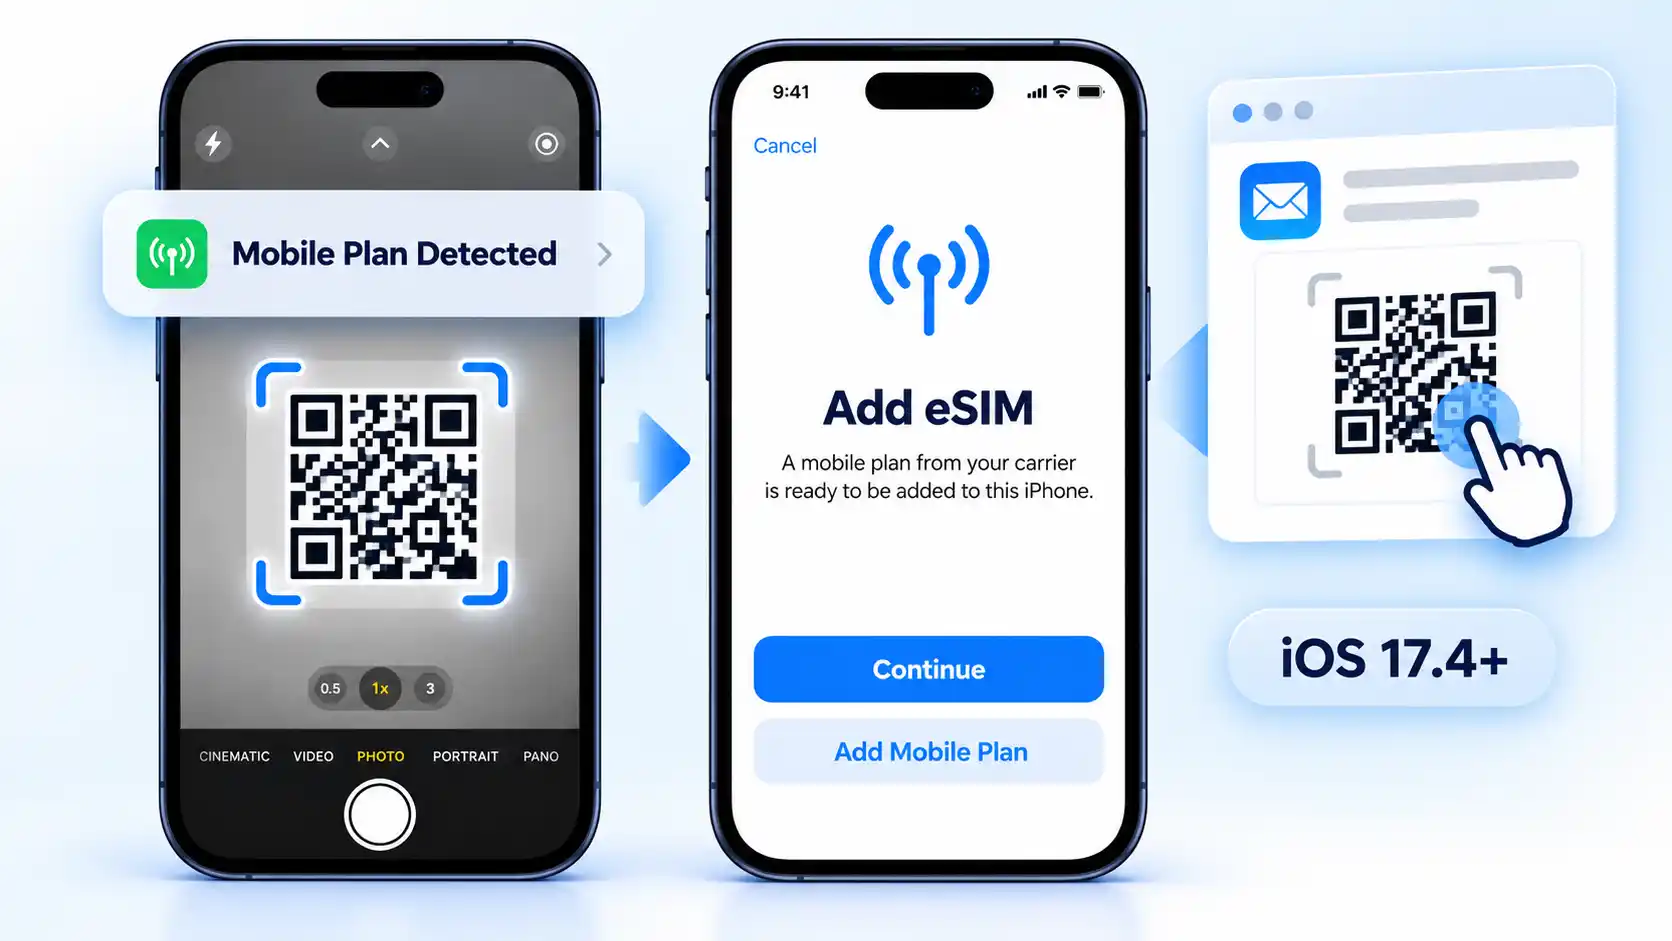
Display the carrier-issued code on a computer, tablet, or another phone, or use a printed copy. Open the iPhone’s Camera app and scan it, then tap Cellular Plan Detected (or Mobile Plan Detected).
QR code on the same iPhone
On iOS 17.4 or later, if the carrier’s code is displayed in the default email app or browser, touch and hold it and tap Add eSIM. Use this instead of trying to scan the same screen with the camera. If that option is unavailable, display the code on another screen or ask the provider for a supported activation method.
Finish either QR route
- Confirm the detected plan. Tap Continue, then Add Cellular Plan or Add Mobile Plan, as shown on your iPhone.
- Enter a confirmation code if requested. Use the code supplied by your carrier. Do not guess one.
- Complete the onscreen prompts. Wait for activation to finish, then check the new line using the verification steps below.
If you are still going through initial iPhone setup, the route is different: when Set Up Cellular or Set Up Mobile appears, tap Use QR code and complete the onscreen activation instructions. Both QR routes are documented in Apple’s current QR-code activation procedure.
Transfer an eSIM From Another iPhone
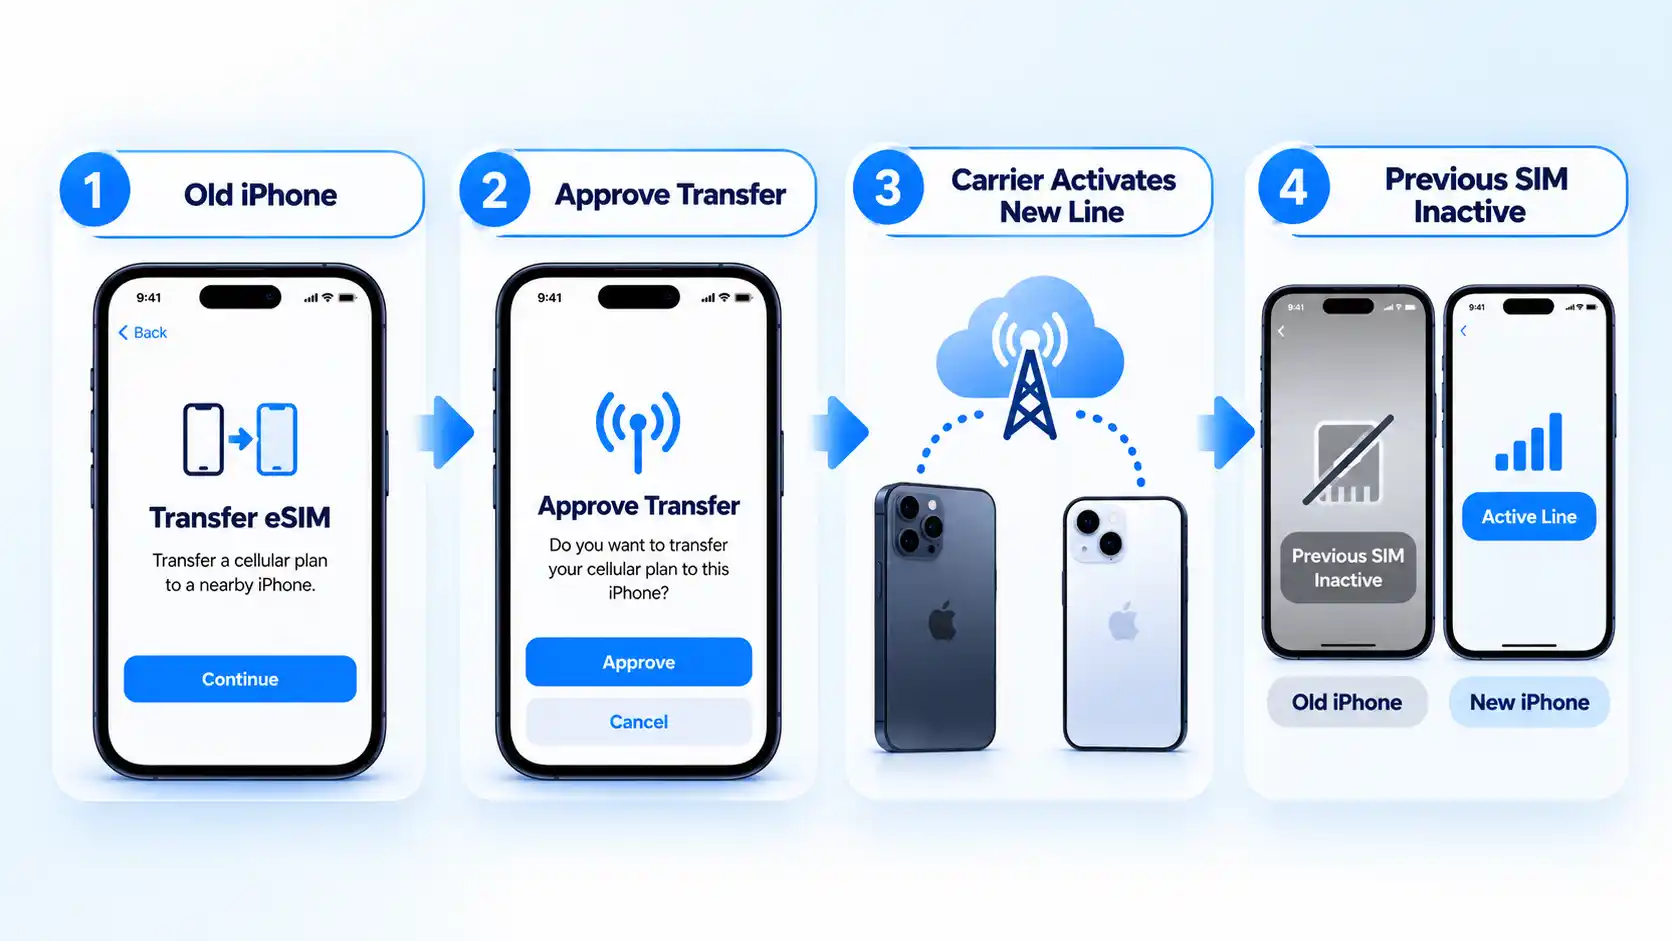
Use eSIM Quick Transfer when the number is already on your previous iPhone and your carrier supports Apple’s device-to-device transfer. Instead of installing a newly issued QR code, you authorize the existing line to move to the new iPhone.
Before starting, sign in to both iPhones with the same Apple Account, unlock the previous iPhone, keep the phones nearby, and turn on Bluetooth. Apple’s current Quick Transfer procedure requires iOS 18.4 or later on both devices.
- Open the cellular settings on the new iPhone. Go to Settings > Cellular.
- Start adding the line. Tap Set Up Cellular or Add eSIM.
- Choose the number to transfer. Select a mobile plan offered from the other iPhone. If no numbers appear, tap Transfer From Nearby iPhone.
- Approve the transfer on the old iPhone. Follow the instructions there and tap Transfer. If the old iPhone asks for a verification code, enter the code displayed on the new iPhone.
- Wait for the new line to activate. Do not treat the transfer as complete merely because it has started. When the mobile plan activates on the new iPhone, the previous SIM for that line becomes inactive.
- Complete a carrier handoff if one appears. If the new iPhone displays Finish Setting Up Your Network Provider’s Mobile Plan, tap the banner. Apple says this redirects you to the carrier’s webpage to finish the eSIM transfer.
Quick Transfer can also appear while you are setting up a new iPhone. In that case, use the transfer option presented during setup instead of starting another transfer in Settings. With iOS 26 or later, Apple says supported transfers can include more than one phone number.
Install a Carrier-Assigned eSIM
Carrier Activation applies when your carrier digitally assigns an eSIM to the iPhone. If the carrier sends the plan after your iPhone has already been set up, a notification tells you that the mobile plan is ready to install; you do not need to obtain a QR code as a second method.
- Open the carrier-plan notification. When Network Provider Mobile Plan Ready to Be Installed (or Carrier Cellular Plan Ready to Be Installed) appears, tap it.
- Open the assigned plan in Settings. Open Settings and tap Network Provider Mobile Plan Ready to Be Installed (or Carrier Cellular Plan Ready to Be Installed).
- Install the plan. Tap Continue at the bottom of the screen and wait for activation to finish.
- Test the connection. If the plan includes voice service, make a call using the new line to check mobile connectivity. For a data-only plan, use the data test below instead. Contact the carrier if the included service does not work.
- Remove a replaced physical SIM only when instructed by the situation. If the newly activated eSIM replaces the plan on a physical SIM, remove that physical SIM and restart the iPhone. Do not remove an unrelated physical SIM that you intend to keep as another line.
If the carrier assigned the eSIM when you bought the iPhone, activation can instead happen during initial device setup. Turn on the iPhone and use the carrier activation presented there. Apple’s Carrier Activation procedure distinguishes this carrier-assigned workflow from QR-code and Quick Transfer setup.
Install an eSIM With a Carrier Link
Use this route if your carrier supplied an activation link. Apple supports this method on iOS 17.4 or later.
- Open the carrier link. Tap the activation link on the iPhone where you want to install the plan.
- Allow the new eSIM. When Activate New eSIM appears, tap Allow.
- Finish activation. Tap Continue and complete the onscreen prompts, then verify the new line below.
Install Through Your Carrier’s App
If your carrier supports app-based activation, download its official app from the App Store and follow its activation instructions. The controls and account requirements are carrier-specific. Some carriers also support moving an existing number through their app.
Enter eSIM Details Manually
Use manual entry when the provider supplies activation information for this purpose. Do not guess server addresses or activation codes.
- Open cellular settings. Go to Settings > Cellular.
- Start adding the plan. Open the add-plan option shown on your device, such as Add eSIM or Add Cellular Plan. If prompted to choose a method, select Use QR Code.
- Choose manual entry. Tap Enter Details Manually at the bottom of the activation screen.
- Enter the provider’s values. Copy the supplied activation information into the matching fields. Enter a confirmation code only if your provider supplied one and it is requested. Ask the provider if a required value is missing.
- Finish the setup. Follow the onscreen prompts to install the plan, then verify its service below.
Apple documents carrier links, apps, and manual entry in its alternative eSIM activation methods. If your device presents a different screen, use the provider’s instructions for your iPhone and iOS version.
Moving an eSIM From Android or Another Phone
If you are moving a number from a non-Apple device, contact your carrier for the supported transfer route. Apple says carriers can use Carrier Activation or issue a QR code. With iOS 26 or later, some participating carriers and smartphone manufacturers also support direct Android-to-iPhone transfers; check Apple’s cross-platform transfer requirements before attempting that route.
Verify the eSIM Is Working
Installation and working service are not quite the same thing. A new line can appear on the iPhone while activation or network connectivity still needs checking, so verify the service before relying on it.
Verify the result
- Open Settings > Cellular, tap the new line, and confirm that Turn On This Line is enabled. An installed profile alone does not prove that its included service works.
- Open Control Center and check that the expected carrier appears in the status area.
- For a plan that includes voice service, open the Phone app and enter a number in the keypad. If you have two lines, tap the line shown near the top and select the new eSIM before placing the test call.
- For a data plan, go to Settings > Cellular > Cellular Data (or Mobile Data) and select the new eSIM. If available, temporarily turn off Allow Cellular Data Switching on that screen. Then go to Settings > Wi-Fi and turn Wi-Fi off. With no voice call in progress, open a new web page in Safari to check that data works on the selected line.
After the test, turn Wi-Fi back on and restore your preferred data line and switching setting. Apple explains how to select the data line and switch numbers for calls. Turning data switching off can affect data availability during calls on the other line.
For a travel eSIM, follow the provider’s instructions on when to install or activate the plan and whether to enable Data Roaming on that line. Do not assume every travel plan has the same settings or validity start time.
Test only services that the plan actually includes. A data-only eSIM, for example, should not be judged by whether it can make a conventional carrier voice call. Apple’s iPhone guide likewise says you can verify activation by checking that the new eSIM line is turned on.
If the eSIM Won’t Install or Activate
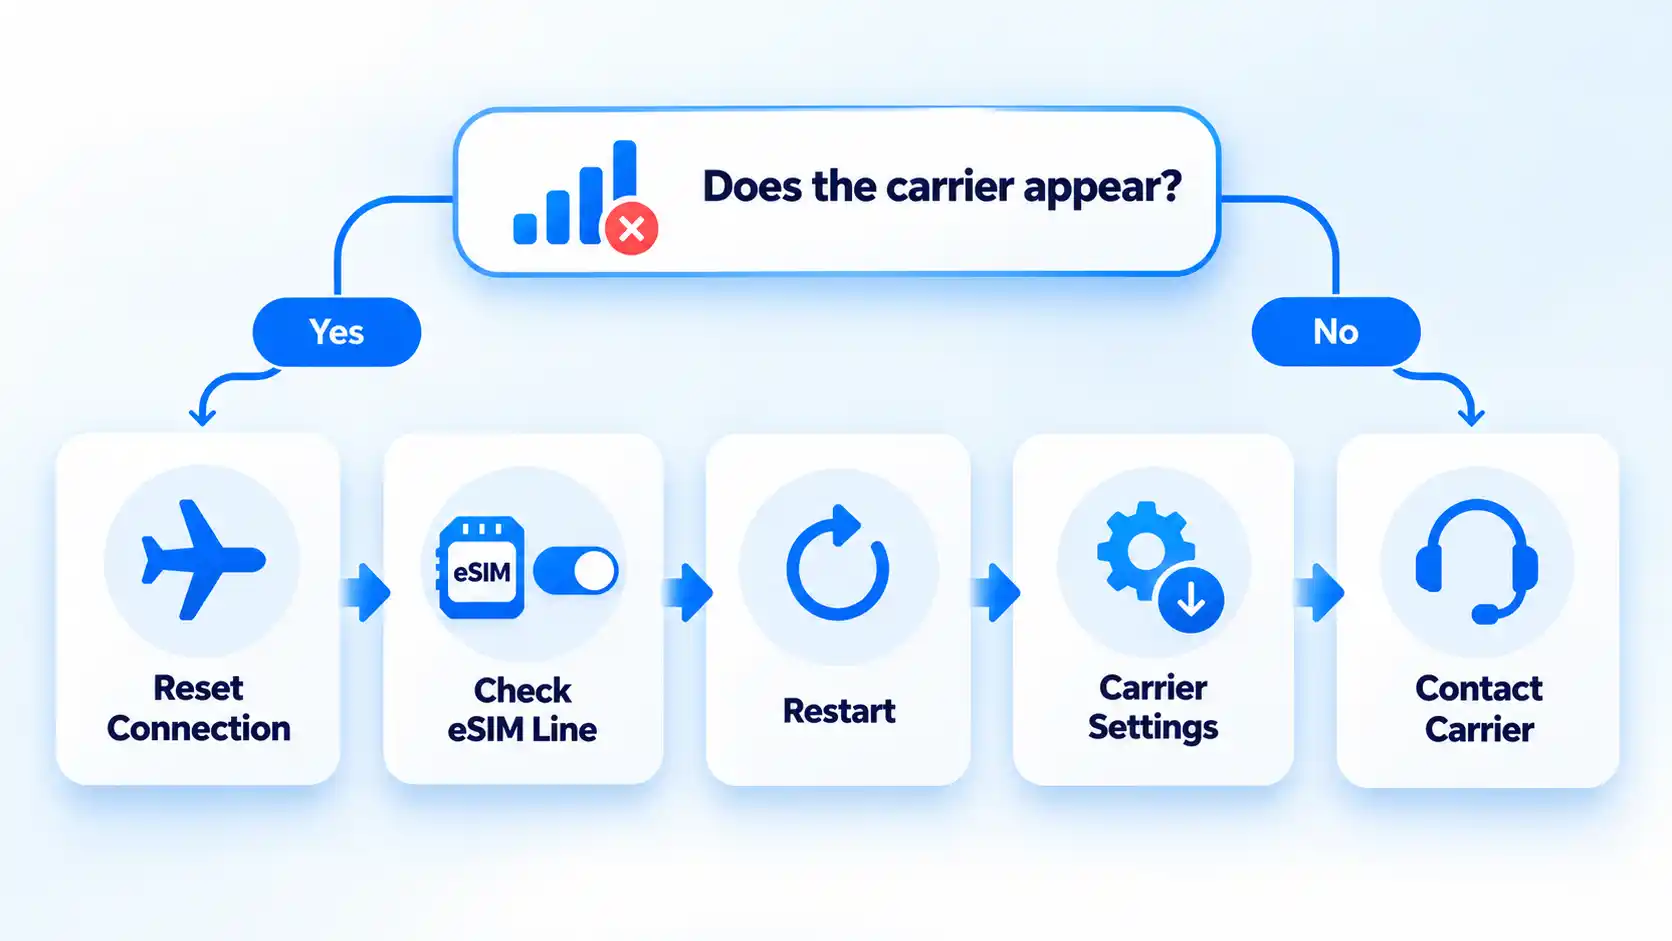
If the correct installation method fails, avoid changing several settings at once. Check one condition, see whether the carrier appears, and move to the next step only if the problem remains. Before troubleshooting, confirm the plan is active, the iPhone has the latest iOS version it supports, and you have the internet connection required for activation. Apple’s current troubleshooting guidance then checks the connection after each action before escalating to the carrier.
The carrier does not appear after eSIM setup
Open Control Center and check the status area. If the carrier is absent, turn Airplane Mode on and then off. Check again before moving to another troubleshooting step. Apple uses the carrier appearing in the status area as the observable check during its eSIM troubleshooting sequence.
The eSIM line appears in Settings but will not connect
Open Settings > Cellular. If the number you are trying to activate appears, turn that line off and then back on. Recheck the carrier status afterward.
Airplane Mode and the line toggle did not fix it
Restart the iPhone, then check again. If the device runs iOS 18 or later, Apple also says the current Apple Support app can run additional diagnostics that may help identify the source of the problem.
The eSIM is still not activating after a restart
Go to Settings > General > About and scroll to the eSIM section. The carrier name and version number appear there. Tap the version number; if an update is available, choose OK or Update, then check the connection again.
The eSIM still fails after the device checks
Contact the carrier that issued the eSIM. Before contacting support, note the exact error message and collect your phone number, carrier account password or PIN, and the iPhone’s IMEI or EID. IMEI identifies the phone on mobile networks; EID is the identifier associated with its embedded SIM. You can find both under Settings > General > About. Apple recommends gathering these details before escalating an eSIM setup failure to the carrier.
The installation is complete when the intended eSIM appears as an enabled line and the cellular service included with that plan works without Wi-Fi or another active line masking the result.

💬 Comments