Your Mailchimp bill is probably tracking people you cannot email. Subscribed, non-subscribed, and unsubscribed contacts all count toward your contact limit, and your pricing tier is built on that total. So an address that opted out long ago still sits on your invoice every month, doing nothing except pushing you toward the next tier.
The second leak is quieter. If you send from Mailchimp’s shared domain instead of your own authenticated domain, Gmail and Yahoo have less reason to trust your mail. Fixing both problems is one project: prune the list you cannot use, then prove to inbox providers that the mail you do send is legitimate.
Quick Take
Segment your least-engaged contacts, run a short re-engagement sequence, then archive the no-shows so they stop counting toward your tier. Archive instead of delete, because archiving is reversible and deletion is not. In parallel, authenticate your sending domain with two CNAME records and a TXT record, publish a DMARC policy, and keep spam complaints under the ceiling Gmail and Yahoo enforce. Judge performance on clicks and sales, not opens.
The contact-count billing trap
Mailchimp builds your pricing tier from two choices: the plan you pick and the maximum contact count you select. That count covers contacts across all your audiences, and it includes people you can never send a campaign to.
Unsubscribed contacts count. Non-subscribed contacts — often buyers synced from a connected store without opting in — count too. Neither group can receive your marketing email, and both still occupy a slot in your tier. Cleaned addresses that bounced and archived contacts do not count, which is the lever you will pull later in this guide.
| Contact type | Can you email them? | Counts toward tier? |
|---|---|---|
| Subscribed | Yes | Yes |
| Unsubscribed | No | Yes |
| Non-subscribed | No marketing campaigns | Yes |
| Cleaned (bounced) | No | No |
| Archived | No, until unarchived | No |
This is why bills drift upward even when your engaged audience is flat. Unsubscribes never leave the count on their own, store integrations keep adding non-subscribed buyers, and dormant subscribers from years ago stay put. Cross your tier limit and Mailchimp charges add-on contact blocks for the overage, month by month, until you change something.
The fix is not a bigger plan. It is a smaller count of contacts you can actually use, plus a habit of reviewing your tier against your real audience size.
Define and segment inactive contacts
An inactive subscriber is an opted-in contact with a valid address who has not interacted with your marketing in a while. How long “a while” is depends on your sending rhythm. A shop with a short sales cycle might call someone inactive after five missed emails. A seasonal business might wait a year. You set the threshold; Mailchimp gives you two ways to find those people.
The first is contact rating. Filter your audience to subscribed contacts with a one-star rating, and you get the long-term disengaged. Contact ratings draw only on regular and A/B test campaign activity, so this filter will not catch people who ignore your automations.
The second is campaign interaction. Filter for subscribed contacts who did not open or did not click across your last five emails, or across all emails within the last week, the last ten days, or the last few months. Add a “date added is before” filter so brand-new subscribers who have not received a campaign yet do not land in the segment.
Build more than one segment. A low-rated contact who bought last month deserves different treatment from a low-rated contact who never purchased. That distinction drives what you offer in the re-engagement email and what you do afterward.
How to cut your contact count without losing data
Run this sequence once per quarter. It takes a few minutes of setup and one short automated series, and it is the single highest-return task in this article.
- Export your audience before touching anything.Download a full export of your audience as a CSV and store it somewhere you control. Do this before any bulk action, every time.Bulk changes are hard to reverse in practice even when the platform allows it, and a local copy costs you nothing. It also gives you a record of who was on the list if a question arises later.
Confirm the file opens and contains your contact rows before you move to the next step.
- Build your inactive segments.Go to Audience, then Segments, and create a segment filtered to subscribed contacts with a one-star contact rating. Save it with a clear name such as “Inactive — rating.”Create a second segment filtered to subscribed contacts who did not open or click your last five emails, and add a date-added filter so recent subscribers are excluded. Save it as “Inactive — last 5.”
Both segments should show a contact count in the segment preview. If either returns zero, your filters are too strict or your list is already clean.
- Send a short re-engagement series.Build an automated series of two or three emails aimed at the inactive segment. Offer something concrete: a discount, a free resource, or a plain question about whether they still want to hear from you.Set post-send actions on the automation so contacts who never engage are handled automatically when the series ends — unsubscribed or moved to a group, depending on your setup. Mailchimp’s own guidance notes that the most successful re-engagement emails typically win back about 10 percent of inactive subscribers, so plan for the majority not to respond.
Watch the segment after the series finishes. Anyone who clicked or purchased has re-engaged and should stay subscribed.
- Archive the no-shows.Select the contacts who finished the series without engaging and archive them from the audience table. Archiving removes them from your contact count while keeping their data and history on file.Do not delete them. Deletion erases personal information permanently, and a deleted contact can only return by signing up through your hosted form. Reserve deletion for privacy erasure requests.
Check your account overview after archiving. Your contact count should drop, and if it crosses a tier boundary, your next bill should reflect the lower tier.
Warning
Archive is the default action for inactive contacts. Deletion is permanent, anonymizes the contact’s data in your reports, and cannot be undone. When a contact asks for erasure under a privacy law such as GDPR or CCPA, Mailchimp notifies you and gives you a window to remove them from every audience and connected integration — that is the case deletion exists for.
Authenticate your domain so your mail lands
Domain authentication proves to receiving mail servers that you authorized the sending. Without it, Gmail and Yahoo have less to go on, and your campaigns are more likely to be filtered or marked as spam. Mailchimp’s manual setup needs three DNS records: two CNAME records for DKIM and one TXT record. Mailchimp also offers Entri, which connects to your DNS provider and creates the records for you.
Domain verification and domain authentication are separate steps. Verification confirms you control the address; authentication is what affects delivery. Complete verification first.
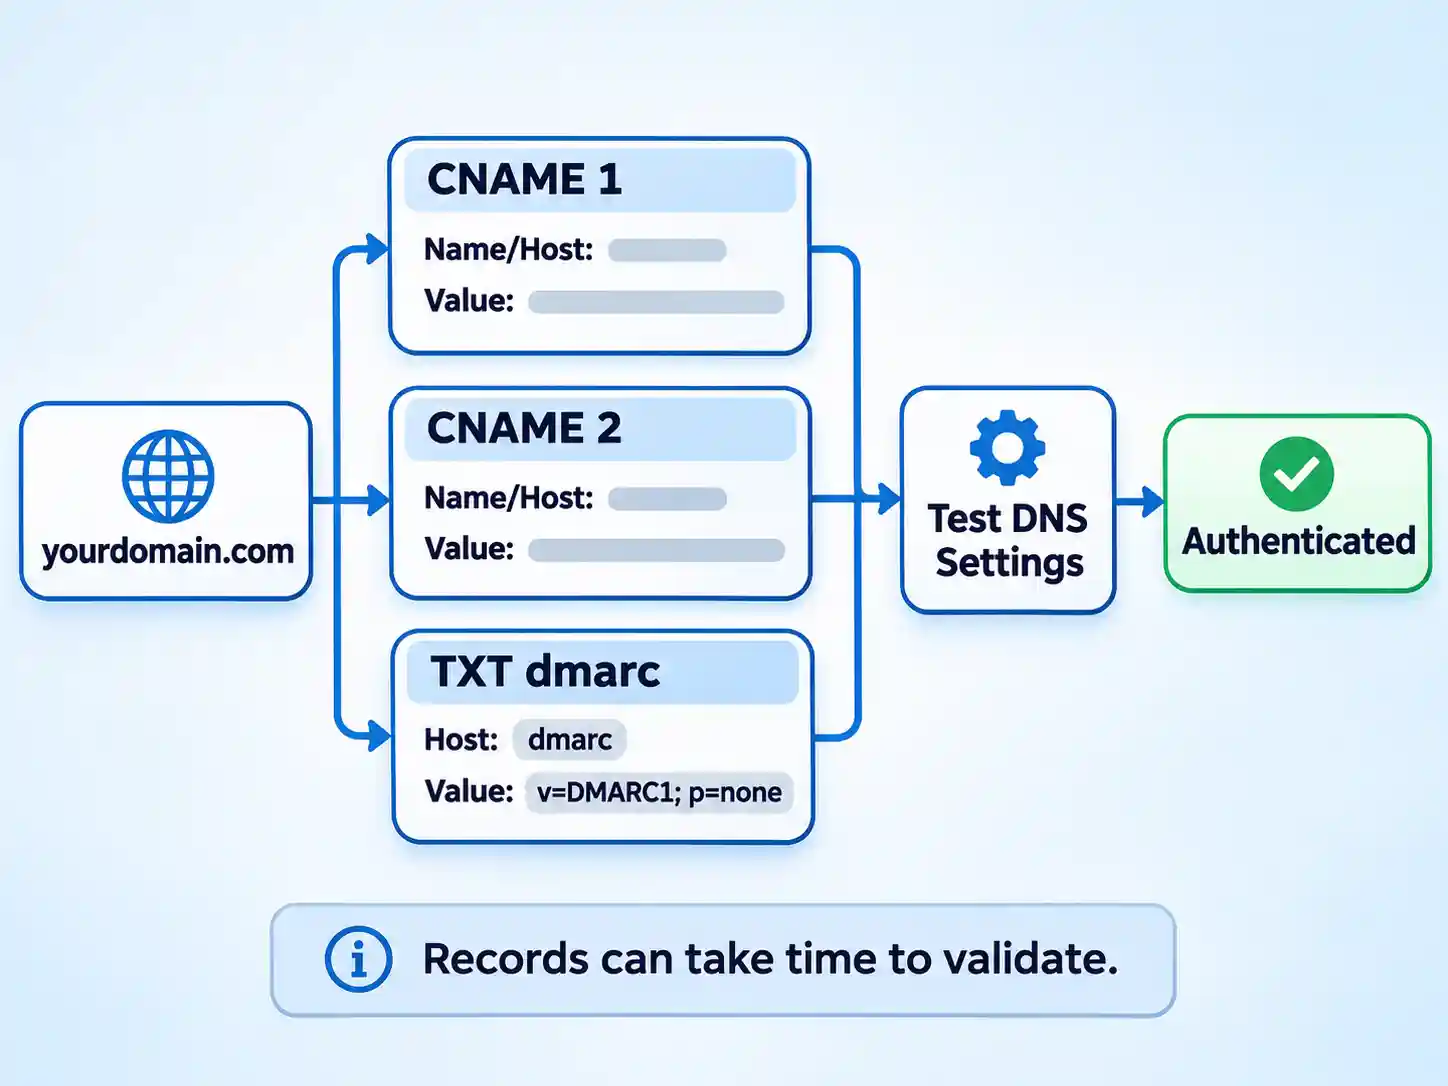
How to authenticate your sending domain in Mailchimp
You need access to your domain’s DNS settings, usually through your registrar or hosting provider. Budget a few minutes for the records to propagate.
- Verify the domain, then open the authentication instructions.In your Mailchimp account, go to Account & billing, open the Domains tab, and verify the domain you send from. Then click Start authentication next to the verified domain.Choose your DNS provider from the dropdown. If yours is not listed, select Other and follow the manual path. Mailchimp can only authenticate domains you own — public email services like Gmail and Yahoo cannot be authenticated.
The next screen should show record instructions with a Name (Host) and Value for each record.
- Add the two DKIM CNAME records.Log in to your DNS provider and create two new CNAME records. Copy the Name (Host) and Value for CNAME 1 and CNAME 2 exactly as Mailchimp displays them.These records publish your DKIM key, which lets receiving servers verify that the message really came from your domain and was not altered in transit. A typo in either field will fail validation.
Save both records at your provider before moving on. Most providers show the new records in their DNS list immediately.
- Add the DMARC TXT record.Create one TXT record with the host value
_dmarcand the value Mailchimp provides, which starts withv=DMARC1; p=none. Some hosts append your domain automatically, so check the record does not end up with the domain twice.Ap=nonepolicy tells receivers to deliver mail that fails checks normally while you monitor. It satisfies the minimum policy Gmail and Yahoo expect from bulk senders.Save the record and confirm it appears in your DNS list with the correct host.
- Validate the records and confirm the status.Return to the Domains page in Mailchimp and let validation run. Most records update within a few minutes, though propagation can take longer depending on your provider and TTL settings.If validation fails, Mailchimp prompts you to resolve or restart authentication. Compare each record against the instructions field by field before retrying.
When it succeeds, an Authenticated label appears next to the domain on the Domains page.
What Gmail and Yahoo expect from bulk senders
Both providers tightened their rules for high-volume senders, and the thresholds are specific. If you send more than 5,000 messages a day to Gmail accounts, Gmail requires SPF and DKIM authentication for your domain plus a DMARC policy, which can be set to none. Gmail also requires a DKIM key of at least 1024 bits, one-click unsubscribe support for marketing messages, and a spam rate below 0.30% as reported in Postmaster Tools.
Yahoo’s requirements follow the same shape: SPF and DKIM together, a valid DMARC policy with at least p=none, one-click unsubscribe, and a spam complaint rate below 0.3%. Yahoo also asks senders to honor unsubscribe requests within two days and recommends periodically sending a reconfirmation email to inactive subscribers.
That last recommendation connects directly to the pruning routine. Sending to people who never read your mail is one of the ways a complaint rate climbs. A smaller, engaged list is easier to keep under the ceiling.
Info
SPF has a hard limit of 10 DNS lookups during evaluation, and exceeding it breaks the check. If you add Mailchimp to an existing SPF record, consolidate includes and remove vendors you no longer use. For many standard Mailchimp marketing sends, DKIM through the CNAME records is the primary mechanism, and SPF inclusion depends on your provider and setup.
Why open rates lie
Open tracking works by embedding a tiny invisible image in your email. When a recipient’s client loads that image, Mailchimp records an open. That mechanism is easy to distort.
Apple’s Mail Privacy Protection pre-fetches email content through proxy servers, which downloads the tracking image whether or not a person read the message. Bot activity like MPP can falsely inflate open and click metrics, and you should exclude bot activity from your reports. Mailchimp also counts a link click as an open when click tracking is enabled, so aggressive spam filters that click links before delivery can register as engagement.
Warning
Treat open rate as a rough signal, not a scoreboard. Open statistics may not be fully accurate. If you A/B test subject lines on opens alone, you may be measuring which line a proxy server fetched first.
Shift your testing and reporting weight to unique clicks and, where you have an e-commerce integration, revenue attributed to the campaign. Clicks require a person to act. Sales require a person to care. Both are harder to fake than an image download.
Design for the inbox
Heavy, multi-column templates with large image blocks are fragile. They can break in mobile clients, and image-only emails give filters and readers little to work with when images are blocked by default. A single-column, text-forward layout with one prominent button is easier to read on a phone and easier for a filter to classify.
This is design judgment, not a measured performance guarantee. Treat it as a starting point: one column, real text for the core message, images as support rather than the message itself, and a button that says what happens when you press it. Then test against your own audience.
For a deeper pass on template structure and content rhythm, see our Mailchimp newsletter tips.
Automations and sunset flows
A generic welcome blast is the floor, not the ceiling. Behavioral automations do more work per contact because they respond to what someone actually did.
- Tag contacts by the links they click, then send follow-ups matched to that interest instead of your whole list.
- Build a post-purchase onboarding sequence that answers the questions a new buyer has in the first week.
- Run a sunset flow for contacts who ignore everything: a short series, then an automatic post-send action that unsubscribes or moves them out.
The sunset flow is where automation and billing meet. It removes disengaged contacts from your active sending without manual work, and it feeds the archive step in your quarterly routine.
Send timing: algorithmic or consistent?
Mailchimp can recommend send times based on your audience’s behavior. That is useful when your list spans time zones or when you have no reliable pattern of your own. The trade-off is predictability: an algorithmic send can land at different times, which makes it harder to build a habit with readers.
| Situation | Better starting choice | Why |
|---|---|---|
| Audience spread across many time zones | Algorithmic send time | Per-contact timing can reach people in their own active window |
| Small, local, habit-driven audience | Fixed morning send | A predictable slot builds routine and makes results easier to compare |
| Testing a new newsletter format | Fixed send | Holding timing constant isolates the effect of your content change |
Pick one, hold it for several sends, and change only one variable at a time. Switching timing and content together tells you nothing about which one moved the numbers.
Your quarterly routine
Verify the result
- Your audience export is saved locally and opens correctly.
- Both inactive segments exist and return a contact count.
- The re-engagement series has run and post-send actions are configured.
- No-shows are archived, not deleted, and your contact count has dropped.
- Your domain shows the Authenticated label on the Domains page.
- A DMARC TXT record exists at
_dmarcwith at leastp=none. - Your spam complaint rate sits below the provider ceiling.
- Your reporting focuses on clicks and attributed sales.
When something goes wrong
Mailchimp says authentication is still in progress after a day
DNS propagation can take a while depending on your provider and the record’s TTL. Check that each record’s Name (Host) and Value match the instructions exactly, and that your host has not appended the domain twice on the _dmarc record. Use the resolve or restart option on the Domains page once the records are confirmed at your provider.
My contact count did not drop after archiving
Confirm the contacts were archived rather than unsubscribed. Unsubscribed contacts still count toward your limit. Also check whether the same address appears in more than one audience, since each audience counts separately. The account overview page shows how close you are to your limit.
I deleted contacts and need them back
Deletion is permanent. A deleted contact cannot be re-imported and can only return by signing up through your hosted Mailchimp form. If you have the pre-action export, you have a record of who was removed, but you cannot restore them to the audience yourself. This is why archiving is the default for inactive contacts.
Open rates look impossibly high
Bot activity, including Apple’s Mail Privacy Protection, can inflate opens and clicks. Exclude bot activity from your reports. Compare open figures against unique clicks and attributed sales before drawing conclusions about a campaign.
My SPF record stopped working after I added a sender
SPF evaluation allows a limited number of DNS lookups, and exceeding the limit breaks the check. Audit your SPF record, remove includes for vendors you no longer use, and consolidate where possible. If your setup’s instructions specify an SPF mechanism, follow those exact instructions rather than adding one from a generic guide.
The bottom line
Effectiveness and cost control are the same job. A list full of people who never read your mail costs you money and gives inbox providers a reason to distrust your sending. A smaller list of engaged contacts, sent from an authenticated domain, costs less and performs better.
Between quarters, keep your reporting honest by weighting clicks and sales over opens. That is the whole system, and it takes less time than the invoice review it replaces.

💬 Comments