To tell if your data has been compromised, search your primary email addresses and phone numbers on breach lookup databases like Have I Been Pwned or CyberNews, check official state data breach registries, audit your credit reports at AnnualCreditReport.com for unauthorized accounts, and inspect your financial accounts and email settings for unrecognized logins or automated forwarding rules.
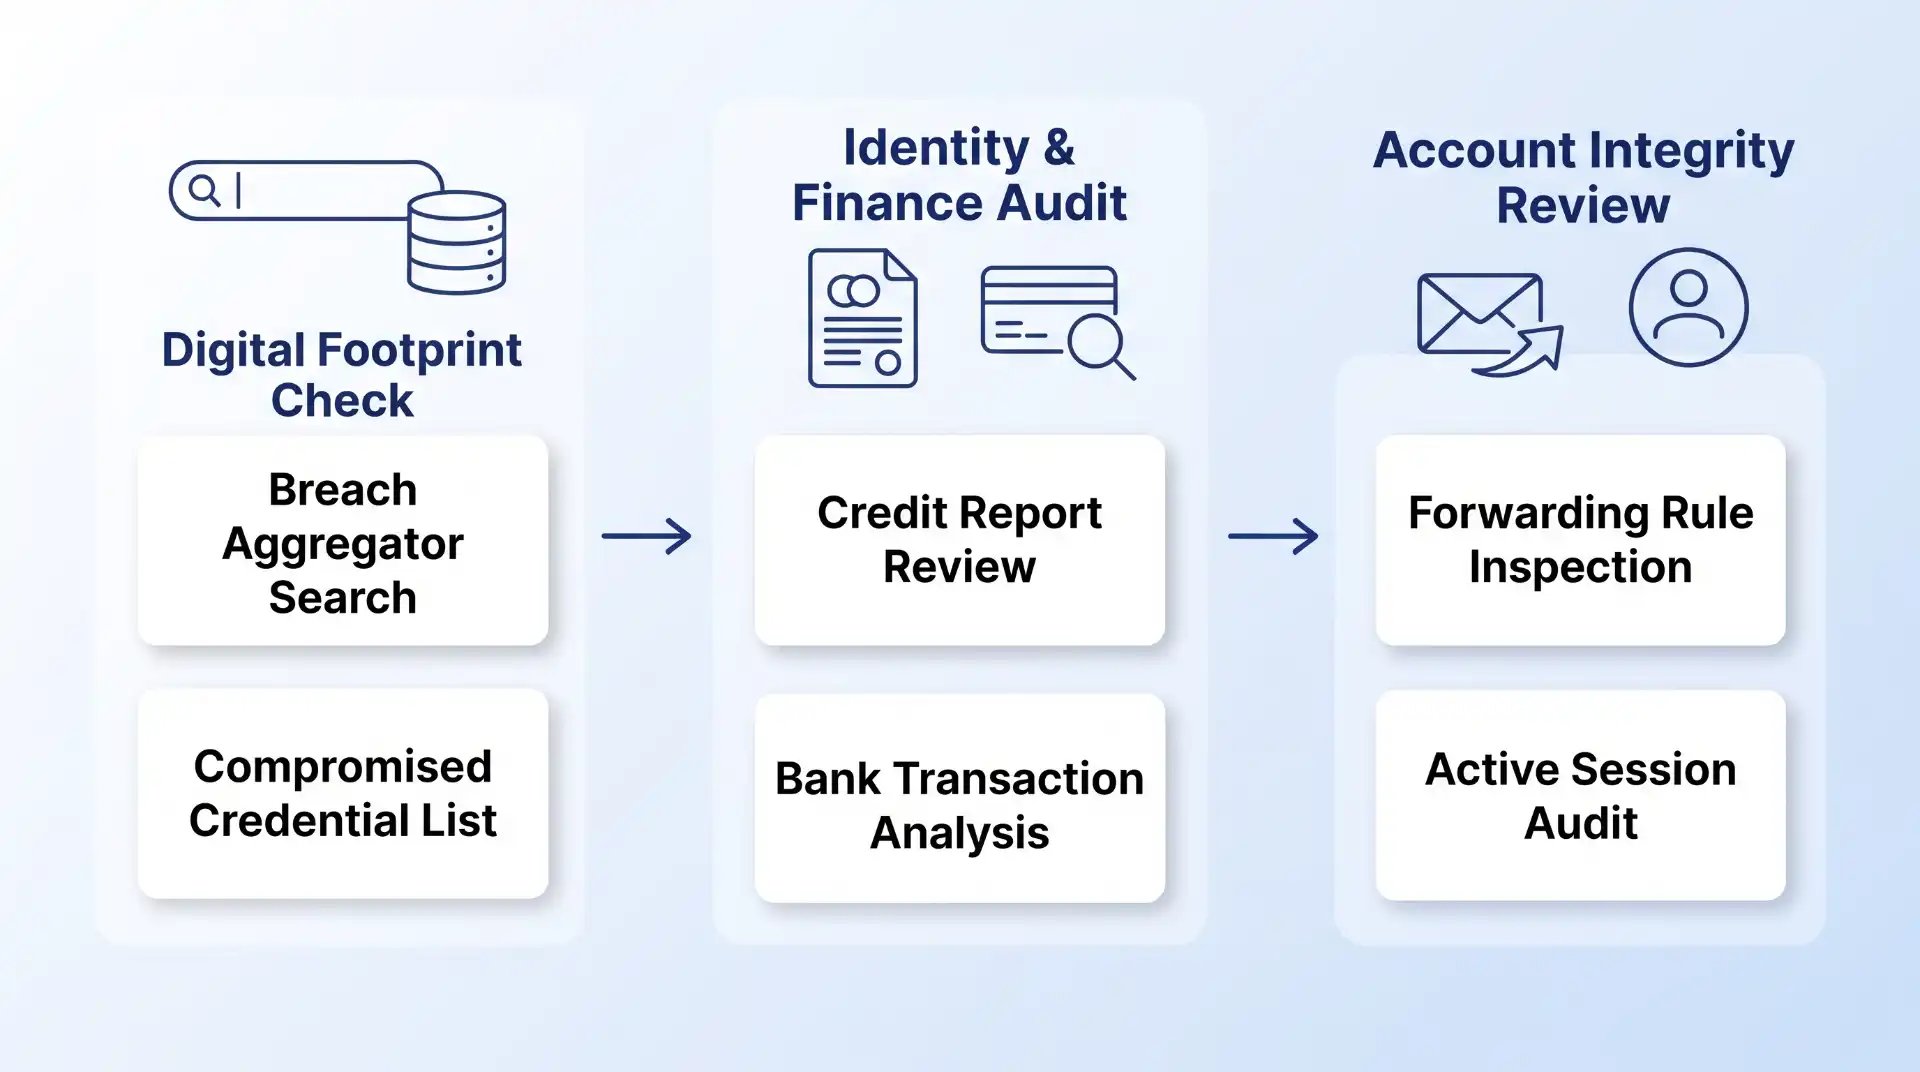
Quick Take: How to Audit Your Data Exposure
Determining whether your personal information has leaked requires a systematic audit across three distinct vectors: public breach aggregators, financial credit bureaus, and individual account security logs. If a database lookup flags an exposed password or your bank statement shows an unfamiliar micro-transaction, treat your credentials as actively compromised. Securing your identity immediately involves revoking active device sessions, updating passwords via a dedicated vault, enforcing hardware or app-based multi-factor authentication, and freezing your credit files across major credit reporting agencies.
Prerequisites for Performing a Personal Data Audit
Before initiating a manual security audit, gather the necessary assets to ensure you do not miss hidden attack vectors or orphan accounts. Having these items prepared reduces the risk of overlooking connected services:
- A Master Account Inventory: A compiled list of every email address, phone number, username, and primary domain name you have used across personal, financial, and work accounts over the past five to ten years.
- Access to a Password Manager: A centralized credential vault (or secure browser storage) to review where reusable passwords may have been deployed across multiple platforms.
- Identification and Credit Documentation: Secure access to your credit monitoring portals or government-issued identification details needed to request official credit reports.
- Secondary Verification Devices: An authenticated smartphone or hardware security key ready to receive time-based one-time password (TOTP) codes as you audit and re-anchor account security.
Step-by-Step: How to Determine If Your Data Has Been Leaked
Data breaches vary significantly depending on what information was stolen. To avoid wasting time on false alarms or misdiagnosing a breach, route your investigation based on the specific exposure vector below.
Step 1: Query Aggregated Data Breach Databases
Threat actors frequently dump or trade stolen databases on illicit forums, paste sites, and dark web marketplaces. Breach aggregators collect these compromised datasets, index the hashed credentials, and allow users to search their exposure without exposing sensitive details.
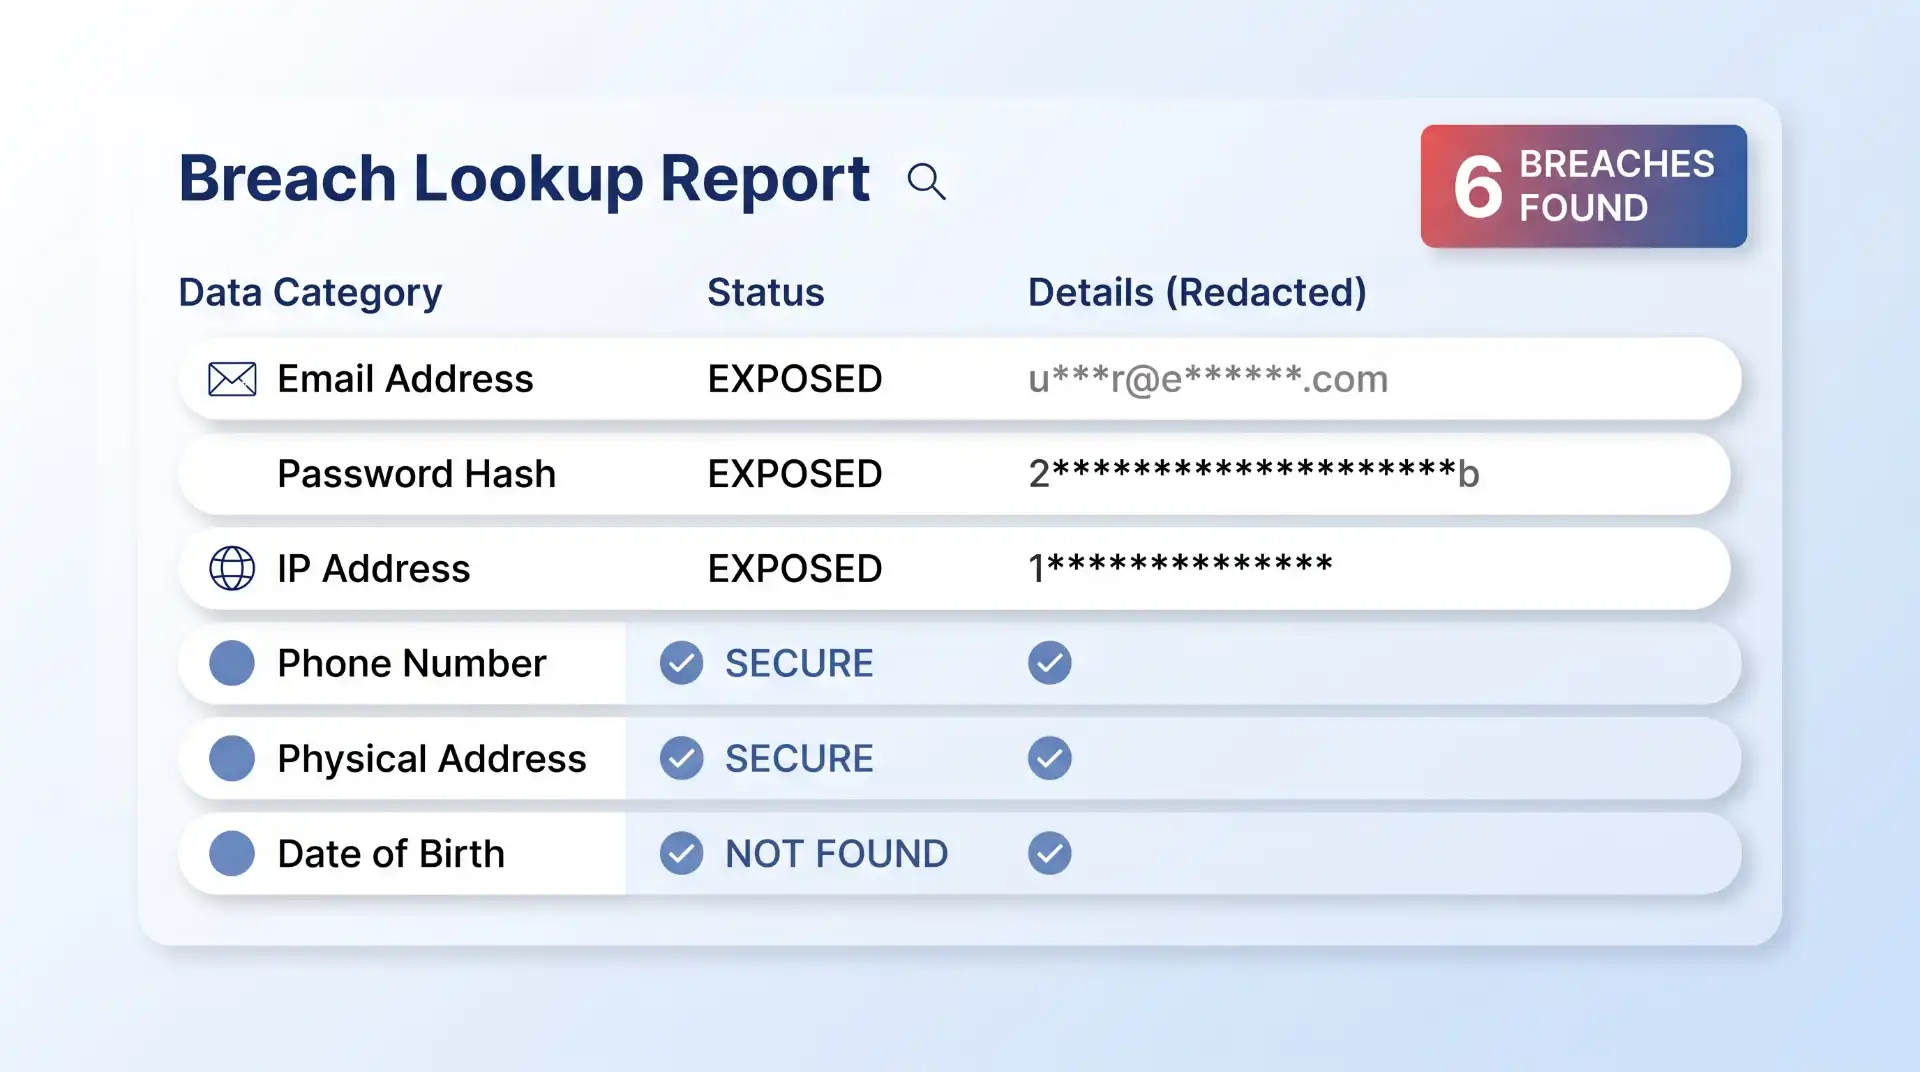
Navigate to an established breach repository such as the CyberNews Personal Data Leak Checker or Have I Been Pwned. Input your primary and secondary email addresses along with phone numbers tied to key online accounts. Review the returned query report to identify which specific services suffered a breach, the exact date of exposure, and what data classes (e.g., plain-text passwords, salt hashes, credit card details, or physical addresses) were included in the leak.
Expected Outcome: You will receive a list of historic and recent database breaches linked to your contact details, highlighting precisely which credentials must be rotated immediately.
Step 2: Search Official State and Corporate Breach Notifications
Companies are legally bound by consumer protection statutes to notify affected customers when a security incident compromises personal identification or financial records. However, physical mail notices and corporate emails can easily be overlooked or filtered into spam folders.
Consult official public breach repositories, such as the California Department of Justice data breach guidelines and public disclosure log, which track corporate security incidents impacting consumers. Cross-reference these logs against major services you use—including medical portals, credit issuers, retail vendors, and educational institutions. Additionally, search your email inbox for keywords like “Notice of Data Breach,” “Security Incident,” or “Unlawful Access.”
Expected Outcome: You will verify whether a vendor holding your sensitive records has formally declared a breach, giving you specific legal timelines and instructions regarding offered credit monitoring services.
Step 3: Inspect Email Account Rules and Inbox Settings
When attackers gain stealthy access to an email account, they rarely change the password immediately. Instead, they create automated inbox rules to redirect incoming mail, hide password reset requests, or intercept financial confirmations without alerting the owner.
Log into your primary email account, open the general account settings, and locate the “Rules,” “Filters,” or “Forwarding and POP/IMAP” tab. Audit every rule to verify that no unknown external email address is secretly receiving a copy of your messages. Check the “Trash” and “Archive” folders for automated filters designed to mark incoming security alerts from banks or social media platforms as read and deleted.
Expected Outcome: You will ensure that your central recovery vector (your primary email account) is not silently routing security alerts and password reset codes directly to a malicious actor.
Step 4: Audit Financial Statements and Credit Bureau Files
Financial identity theft often begins with small, innocuous transactions. Fraudsters run micro-charges—frequently between $0.50 and $3.00—to confirm that a stolen payment card or bank routing number is active before executing larger fraudulent purchases or line-of-credit applications.
Log into your checking, savings, and credit card accounts to review line-item transactions over the past 30 to 60 days. If you find any unfamiliar charge, even for a minimal amount, contact your card issuer immediately to report account compromise. Next, access your free credit reports from Equifax, Experian, and TransUnion via AnnualCreditReport.com. Inspect the “Hard Inquiries” and “Open Accounts” sections for credit lines, personal loans, or store cards that you did not explicitly apply for.
Expected Outcome: You will detect early indicators of financial identity theft and spot unauthorized credit applications before they damage your overall credit standing. If you regularly use credit cards for online transactions, reviewing baseline features and security protocols by understanding different types of credit cards can help you spot anomalous account behavior faster.
Step 5: Review Active Sessions and Connected OAuth Applications
Modern account compromises increasingly rely on session hijacking—where attackers steal active session cookies or leverage third-party OAuth application tokens to bypass traditional password authentication entirely.
Open the security panel of your core accounts (e.g., Google, Apple, Microsoft, social networks, and password managers). Locate the “Active Sessions,” “Devices,” or “Where You’re Logged In” section. Terminate any session linked to an unrecognized device, outdated operating system, or unfamiliar geographic location. Next, navigate to “Connected Apps” or “Third-Party Permissions” and revoke access for any legacy application or service you no longer actively use.
Expected Outcome: Invalidating active session tokens immediately severs an attacker’s persistent backdoor access, forcing any unauthorized party to re-authenticate from scratch.
Verification: Confirming Whether Exposure Is Active or Historical
Not all data breach results require the same immediate panic. Distinguishing between a historical, static database leak and an active, ongoing account intrusion dictates your response speed and tactical priorities.
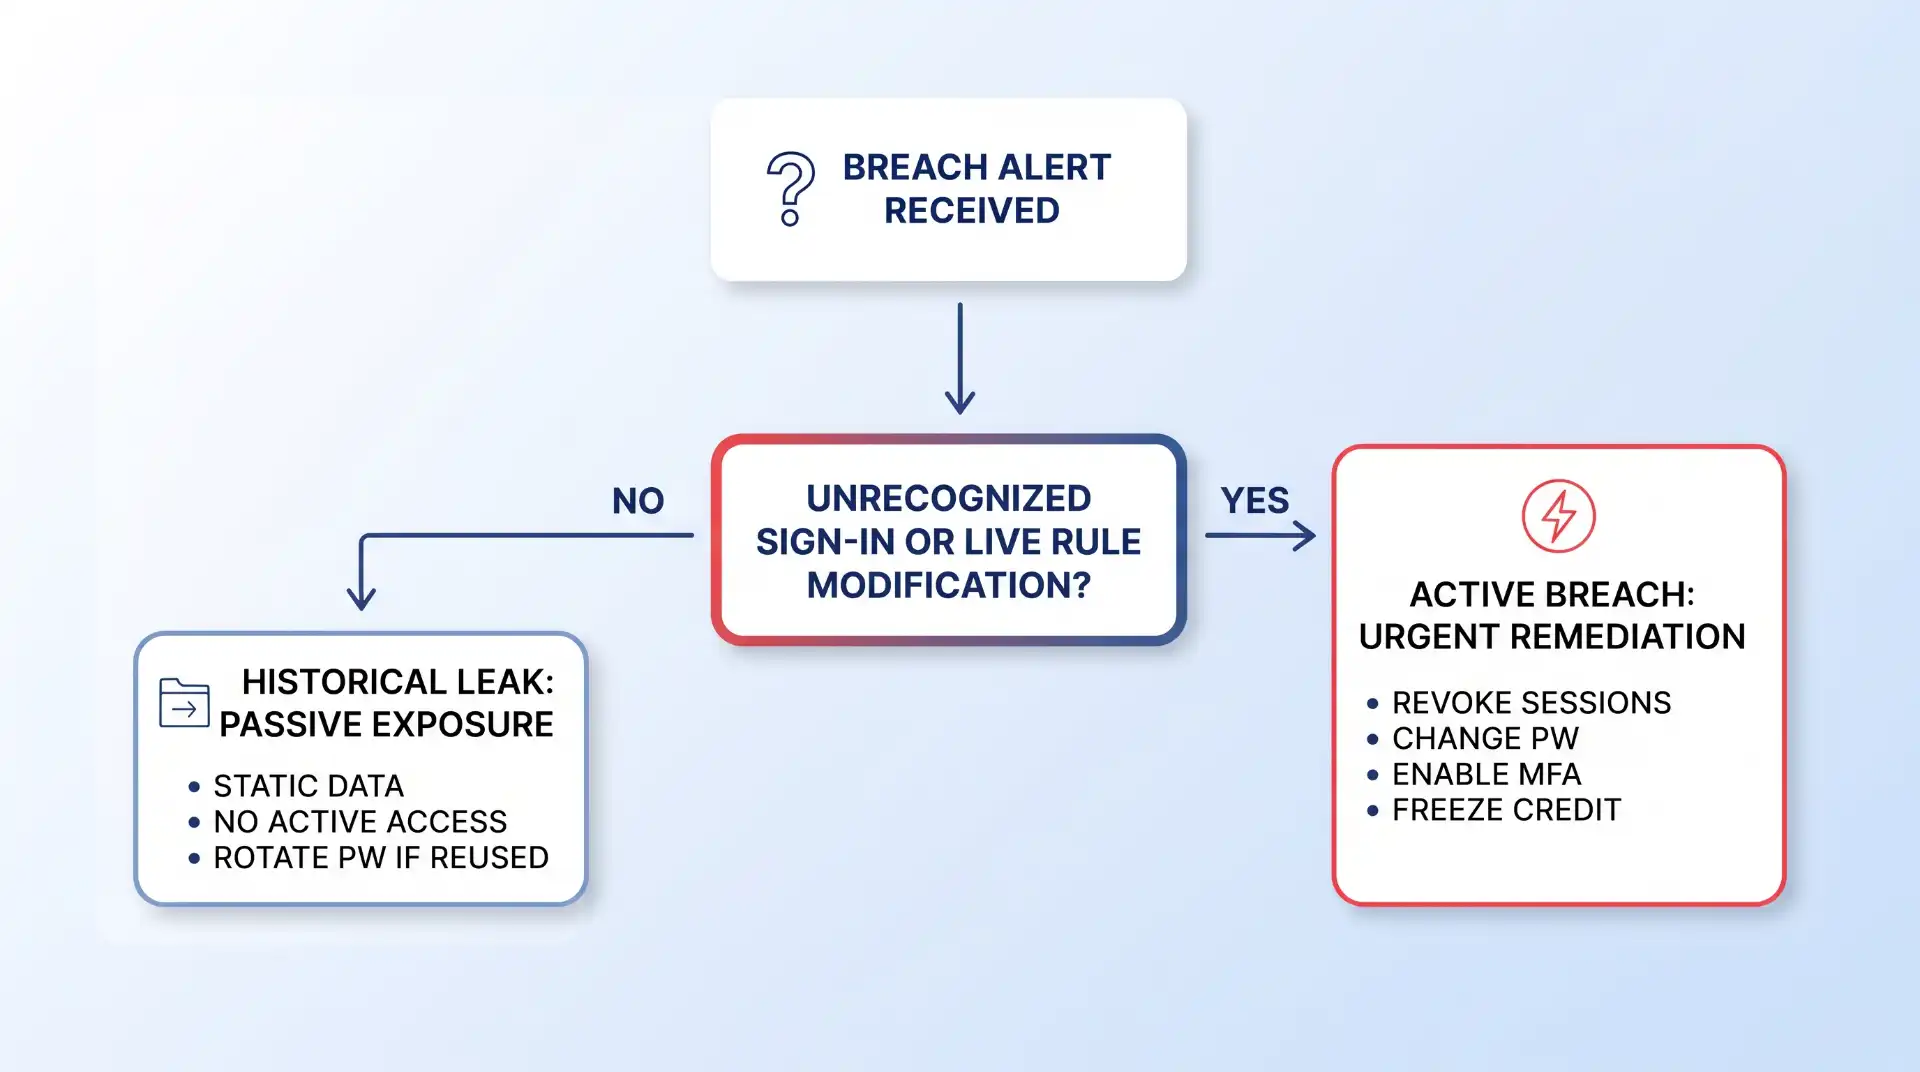
To verify if an exposure is active:
- Check Real-Time Sign-In Logs: Review the timestamps and IP addresses in your account security logs. If an IP address from an unfamiliar region logged in within the past 24 hours, the compromise is live and active.
- Test Existing Credentials: If your password no longer works and you have not recently changed it, an attacker may have already taken over the account and altered the recovery email or phone number.
- Evaluate Password Reuse Scope: A entry in a breach database from five years ago may be harmless if you have changed that password since. However, if that old password is still used across active services today, treat every single one of those destination accounts as actively vulnerable. Implementing robust credential management habits and evaluating whether are password managers really safe will significantly reduce your attack surface during cross-platform exposures.
Troubleshooting: What to Do When Signs Point to Compromise
If your diagnostic audit reveals active unauthorized access, execute this recovery escalation path to re-establish control over your identity and accounts.
Failure Point 1: You Are Locked Out of Your Primary Account
Fix: Initiate the service provider’s account recovery workflow immediately. Use a trusted, known device and network connection previously associated with the account. If the recovery email or phone number was altered, select “Try another way” to supply account creation dates, previous passwords, or identity verification documents. If the account contains financial or billing information, contact customer support by phone to place an administrative hold on the profile while identity verification takes place.
Failure Point 2: Password Resets Fail to Stop Unauthorized Sign-Ins
Fix: Changing your password does not always terminate active browser sessions if an attacker holds a persistent session cookie or OAuth token. According to Lunar Cyber’s breach monitoring analysis, modern infostealer malware extracts session tokens and browser state data, enabling bad actors to bypass standard password resets. After changing your password, explicitly click “Log out of all other sessions” or “Revoke all active tokens” across all settings menus. Run an up-to-date malware scan on your local machine to eliminate active infostealer Trojans that may be capturing keypresses or browser session files in real time.
Failure Point 3: Your Social Security Number or Government ID Was Exposed
Fix: Password resets cannot safeguard physical identity attributes like Social Security numbers or driver’s license numbers. Take formal legal and credit protection measures immediately: submit an official report via IdentityTheft.gov, follow established legal identity theft response protocols, and contact each of the three nationwide credit bureaus (Equifax, Experian, TransUnion) to initiate a full credit freeze. You can also explore placing a credit freeze or fraud alert depending on the severity of the document exposure.
Limits of Breach Detection Tools and Manual Audits
While public breach lookup services and account security audits are essential components of digital hygiene, they possess inherent structural limitations that every user should understand:
- Reporting Lag Times: Breach aggregators rely on public dumps, security research contributions, or threat intelligence feeds. Months or even years can elapse between an actual security breach and its publication on public lookup platforms.
- Private Threat Intelligence Gaps: Proprietary databases stolen by sophisticated threat actors are often sold privately or leveraged exclusively for targeted spear-phishing and extortion, meaning they will never appear in searchable public repositories.
- Session Token Exploits: Modern credential theft extends far beyond static text passwords. If malware steals local browser session cookies, breach tools searching for leaked text credentials will show no alert, even while your active sessions are being accessed.
- Enterprise and Business Scope: Individual consumer tools only check personal identifiers. Organization-level breaches often require specialized monitoring focused on protecting customer data, internal access logs, and API endpoint security.
Key Takeaways for Long-Term Data Security
Maintaining long-term digital privacy requires moving from reactive panic to proactive operational security. Apply these key practices to keep your exposure minimal:
Key Takeaways
- Eliminate Password Reuse: Use a dedicated password manager to generate and store randomized 16+ character passphrases for every individual account.
- Enforce Strong Multi-Factor Authentication: Transition away from vulnerable SMS-based verification codes and set up two-factor authentication using authenticator applications (such as Google Authenticator) or physical FIDO2 security keys.
- Freeze Your Credit Files: Keep your credit files frozen at Equifax, Experian, and TransUnion by default, thawing them only temporarily when applying for new credit lines.
- Prune Legacy Accounts and App Permissions: Delete unused online accounts and regularly revoke third-party OAuth access tokens connected to your primary email and social profiles.
- Stay Vigilant Against Social Engineering: Treat unexpected communications with heightened skepticism by learning the warning signs for identifying targeted phishing scams that exploit leaked personal details.
- Adopt Comprehensive Security Standards: For broader personal defense strategies, review overall best practices to maximize your data security across home networks, mobile devices, and cloud storage accounts.
Frequently Asked Questions
How long does it take for stolen data to show up on breach lookup tools?
According to Experian’s data breach assessment guide, it can take anywhere from a few days to several months—or even years—for breached data to appear on public lookups. The delay depends on how quickly the breach is discovered by the company, when disclosure laws require notification, and when threat actors upload or trade the stolen database publicly.
What should I do if my password was leaked but I use two-factor authentication?
While two-factor authentication (2FA) prevents an attacker from logging in with a stolen password alone, you should still change the compromised password immediately. An exposed password reduces your overall defense to a single security layer, leaving you vulnerable to 2FA fatigue attacks, SIM-swapping, or session hijacking.
Is it safe to enter my email address into breach lookup websites?
Yes, provided you use reputable, established breach lookups like Have I Been Pwned, F-Secure Identity Theft Checker, or CyberNews. These tools process your email address or phone number safely without requesting account passwords, recovery codes, or sensitive financial data.
Does changing my password automatically log out someone who stole my session cookie?
Not always. Some web platforms do not automatically invalidate active session tokens when a password is reset. To ensure an attacker is completely locked out, navigate to your account’s security settings and manually select “Log Out All Devices” or “Revoke Active Sessions.”

💬 Comments